- Node
- Ruby
- Python
- PHP
- .NET
- Java
- Go
Overview
This guide shows how to make an outgoing call to multiple numbers and greet call recipients with a text-to-speech message when they answer. Use cases such as voice notifications and alerts, voice surveys, and voice one-time passwords involve outbound calls as part of their call flow.You can start making and receiving calls either by using our PHLO visual workflow builder or our APIs and XML documents. Follow the instructions in one of the tabs below.- Using XML
To make bulk calls using Plivo APIs, you make an HTTP POST request to the Call API as you would to place a single outbound call, but add multiple destination numbers.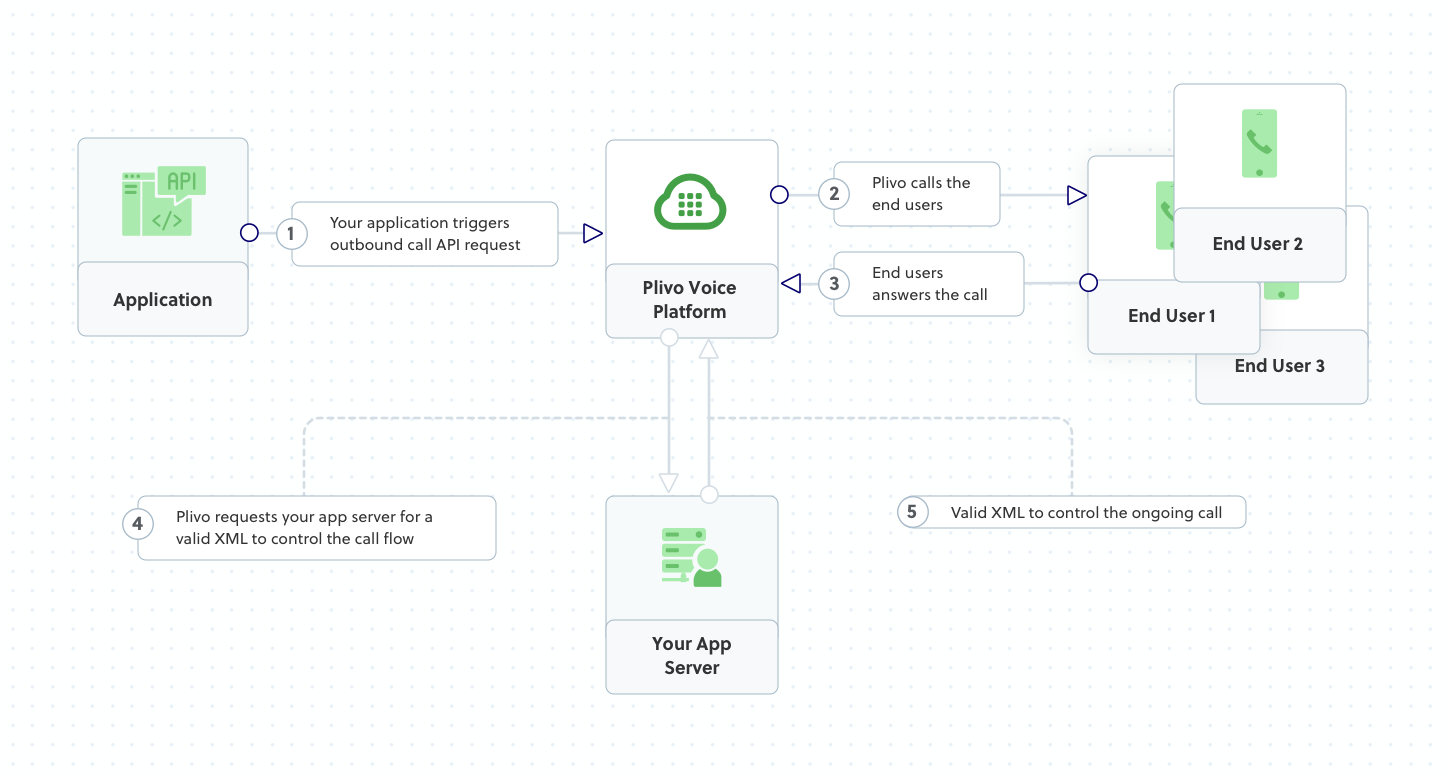
How it works
Copy
Ask AI
<Response>
<Speak>Congratulations! You've made your first outbound call!</Speak>
</Response>
Prerequisites
To get started, you need a Plivo account — sign up with your work email address if you don’t have one already. You can also follow our instructions to set up a Node.js development environment.Make an outbound call to multiple numbers
Create a file calledBulkcall.js and paste into it this code.Copy
Ask AI
var plivo = require('plivo');

(function main() {
    'use strict';

    var client = new plivo.Client("<auth_id>","<auth_token>");
    client.calls.create(
        "<caller_id>", // from
        "destination_number1<destination_number2", // to
        "https://s3.amazonaws.com/static.plivo.com/answer.xml", // answer url
        {
            answerMethod: "GET",
        },
    ).then(function (response) {
        console.log(response);
    }, function (err) {
        console.error(err);
    });
})();
Test
Save the file and run it.Copy
Ask AI
$ node Bulkcall.js
Overview
This guide shows how to make an outgoing call to multiple numbers and greet call recipients with a text-to-speech message when they answer. Use cases such as voice notifications and alerts, voice surveys, and voice one-time passwords involve outbound calls as part of their call flow.You can start making and receiving calls either by using our PHLO visual workflow builder or our APIs and XML documents. Follow the instructions in one of the tabs below.- Using XML
To make bulk calls using Plivo APIs, you make an HTTP POST request to the Call API as you would to place a single outbound call, but add multiple destination numbers.
How it works
Copy
Ask AI
<Response>
<Speak>Congratulations! You've made your first outbound call!</Speak>
</Response>
Prerequisites
To get started, you need a Plivo account — sign up with your work email address if you don’t have one already. You can also follow our instructions to set up a Ruby development environment.Make an outbound call to multiple numbers
Create a file calledbulk_call.rb and paste into it this code.Copy
Ask AI
require 'rubygems'
require 'plivo'

include Plivo
include Plivo::Exceptions

api = RestClient.new("<auth_id>","<auth_token>")

begin
  response = api.calls.create(
    '<caller_id>',
    ['<destination_number1>', '<destination_number2>'],
    'https://s3.amazonaws.com/static.plivo.com/answer.xml',
     {
            answer_method: "GET",
     },
  )
  puts response
rescue PlivoRESTError => e
  puts 'Exception: ' + e.message
end
Test
Save the file and run it.Copy
Ask AI
$ ruby bulk_call.rb
Overview
This guide shows how to make an outgoing call to multiple numbers and greet call recipients with a text-to-speech message when they answer. Use cases such as voice notifications and alerts, voice surveys, and voice one-time passwords involve outbound calls as part of their call flow.You can start making and receiving calls either by using our PHLO visual workflow builder or our APIs and XML documents. Follow the instructions in one of the tabs below.- Using XML
To make bulk calls using Plivo APIs, you make an HTTP POST request to the Call API as you would to place a single outbound call, but add multiple destination numbers.
How it works
Copy
Ask AI
<Response>
<Speak>Congratulations! You've made your first outbound call!</Speak>
</Response>
Prerequisites
To get started, you need a Plivo account — sign up with your work email address if you don’t have one already. You can also follow our instructions to set up a Python development environment.Make an outbound call to multiple numbers
Create a file calledbulk_call.py and paste into it this code.Copy
Ask AI
import plivo

client = plivo.RestClient('<auth_id>','<auth_token>')
response = client.calls.create(
    from='<caller_id>',
    to='destination_number1<destination_number2',
    answer_url='https://s3.amazonaws.com/static.plivo.com/answer.xml',
    answer_method='GET', )
print(response)
Test
Save the file and run it.Copy
Ask AI
$ python bulk_call.py
Overview
This guide shows how to make an outgoing call to multiple numbers and greet call recipients with a text-to-speech message when they answer. Use cases such as voice notifications and alerts, voice surveys, and voice one-time passwords involve outbound calls as part of their call flow.You can start making and receiving calls either by using our PHLO visual workflow builder or our APIs and XML documents. Follow the instructions in one of the tabs below.- Using XML
To make bulk calls using Plivo APIs, you make an HTTP POST request to the Call API as you would to place a single outbound call, but add multiple destination numbers.
How it works
Copy
Ask AI
<Response>
<Speak>Congratulations! You've made your first outbound call!</Speak>
</Response>
Prerequisites
To get started, you need a Plivo account — sign up with your work email address if you don’t have one already. You can also follow our instructions to set up a PHP development environment.Make an outbound call to multiple numbers
Create a file calledBulkCall.php and paste into it this code:Copy
Ask AI
<?php
require 'vendor/autoload.php';
use Plivo\RestClient;

$auth_id    = "<auth_id>";
$auth_token = "<auth_token>";
$p          = new RestClient($auth_id, $auth_token);

$response = $client->calls->create('<caller_id>',
                                 ['<destination_number1>', '<destination_number2>'],
                                 'https://s3.amazonaws.com/static.plivo.com/answer.xml',);
print_r($response);
Test
Save the file and run it.Copy
Ask AI
$ php BulkCall.php
Overview
This guide shows how to make an outgoing call to multiple numbers and greet call recipients with a text-to-speech message when they answer. Use cases such as voice notifications and alerts, voice surveys, and voice one-time passwords involve outbound calls as part of their call flow.You can start making and receiving calls either by using our PHLO visual workflow builder or our APIs and XML documents. Follow the instructions in one of the tabs below.- Using XML
To make bulk calls using Plivo APIs, you make an HTTP POST request to the Call API as you would to place a single outbound call, but add multiple destination numbers.
How it works
Copy
Ask AI
<Response>
<Speak>Congratulations! You've made your first outbound call!</Speak>
</Response>
Prerequisites
To get started, you need a Plivo account — sign up with your work email address if you don’t have one already. You can also follow our instructions to set up a .NET development environment.Make an outbound call to multiple numbers
In Visual Studio, in the CS project, open the fileProgram.cs and paste into it this code.Copy
Ask AI
using System;
using System.Collections.Generic;
using Plivo;

namespace testplivo
{
    class Program
    {
        static void Main(string[] args)
        {
            var api = new PlivoApi("<auth_id>","<auth_token>");
            var response = api.Call.Create(
                to: new List<String> { "<destination_number1>", "<destination_number2>" },
                from: "<caller_id>",
                answerMethod: "GET",
                answerUrl: "https://s3.amazonaws.com/static.plivo.com/answer.xml"
            );
            Console.WriteLine(response);
        }
    }
}
Test
Save the file and run it.Overview
This guide shows how to make an outgoing call to multiple numbers and greet call recipients with a text-to-speech message when they answer. Use cases such as voice notifications and alerts, voice surveys, and voice one-time passwords involve outbound calls as part of their call flow.You can start making and receiving calls either by using our PHLO visual workflow builder or our APIs and XML documents. Follow the instructions in one of the tabs below.- Using XML
To make bulk calls using Plivo APIs, you make an HTTP POST request to the Call API as you would to place a single outbound call, but add multiple destination numbers.
How it works
Copy
Ask AI
<Response>
<Speak>Congratulations! You've made your first outbound call!</Speak>
</Response>
Prerequisites
To get started, you need a Plivo account — sign up with your work email address if you don’t have one already. You can also follow our instructions to set up a Java development environment.Make an outbound call to multiple numbers
Create a Java class in the project calledBulkCall and paste into it this code.Copy
Ask AI
import java.io.IOException;
import java.util.Collections;
import com.plivo.api.Plivo;
import com.plivo.api.exceptions.PlivoRestException;
import com.plivo.api.models.call.Call;
import com.plivo.api.models.call.CallCreateResponse;

class MakeCall {
    public static void main(String [] args) throws IOException, PlivoRestException {
        Plivo.init("<auth_id>","<auth_token>");
        CallCreateResponse response = Call.creator("<caller_id>",
                Collections.singletonList("<destination_number1>", "<destination_number2>"),
                "https://s3.amazonaws.com/static.plivo.com/answer.xml")
                .answerMethod("GET")
                .create();
        System.out.println(response);
    }
}
Test
Save the file and run it.Overview
This guide shows how to make an outgoing call to multiple numbers and greet call recipients with a text-to-speech message when they answer. Use cases such as voice notifications and alerts, voice surveys, and voice one-time passwords involve outbound calls as part of their call flow.You can start making and receiving calls either by using our PHLO visual workflow builder or our APIs and XML documents. Follow the instructions in one of the tabs below.- Using XML
To make bulk calls using Plivo APIs, you make an HTTP POST request to the Call API as you would to place a single outbound call, but add multiple destination numbers.
How it works
Copy
Ask AI
<Response>
<Speak>Congratulations! You've made your first outbound call!</Speak>
</Response>
Prerequisites
To get started, you need a Plivo account — sign up with your work email address if you don’t have one already. If this is your first time using Plivo APIs, follow our instructions to set up a Go development environment.Make an outbound call to multiple numbers
Create a file calledBulkCall.go and paste into it this code:Copy
Ask AI
package main

import "fmt"
import "github.com/plivo/plivo-go/v7"

func main() {
	client, err := plivo.NewClient("<auth_id>","<auth_token>", &plivo.ClientOptions{})
	if err != nil {
			fmt.Print("Error", err.Error())
			return
		}
	response, err := client.Calls.Create(
		plivo.CallCreateParams{
			From: "<caller_id>",
			To: "destination_number1<destination_number2",
			AnswerURL: "https://s3.amazonaws.com/static.plivo.com/answer.xml",
			AnswerMethod: "GET",
		},
	)
	if err != nil {
			fmt.Print("Error", err.Error())
			return
		}
	fmt.Printf("Response: %#v\n", response)
}
Test
Save the file and run it.Copy
Ask AI
go run BulkCall.go