- Python & Flask
- Python & Django
- Python & FastAPI
- Python & Sanic
Get Started with Python Using Flask Framework
Start by signing up for a free trial account that you can use to experiment with and learn about our services. The free trial account comes with free credits, and you can add more as you go along. You can also add a phone number to your account to start testing the full range of our voice and SMS features. A page in our support portal walks you through the signup process.You can start making and receiving calls either by using our PHLO visual workflow builder or our APIs and XML documents. Follow the instructions in one of the tabs below.- Using PHLO
- Using XML
Set up your Python Flask dev environment
You must set up and install Python, Flask, and Plivo’s Python SDK before you make your first call.Install Python
Download and install Python from its official site.Install Flask and the Plivo Python SDK
Create a projects directory and change into it.Copy
Ask AI
$ mkdir mypythonapp
$ cd mypythonapp
Copy
Ask AI
pip install flask plivo
Copy
Ask AI
python setup.py install
sudo with your commands and overwriting dependencies.Make your first outbound call
You can create and deploy a PHLO to make an outbound call with a few clicks on the PHLO canvas, and trigger it with some simple code.Create the PHLO
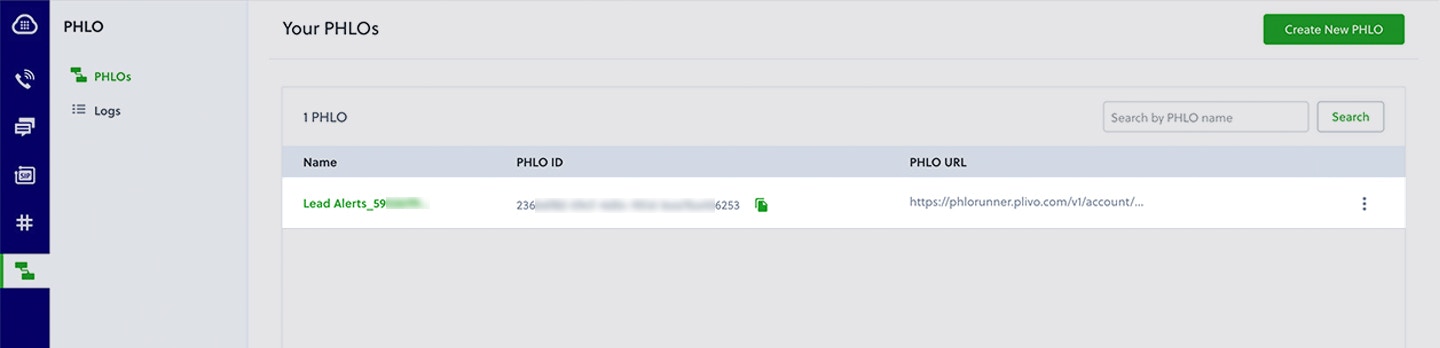
To create a PHLO, visit the PHLO page of the Plivo console. If this is your first PHLO, the PHLO page will be empty.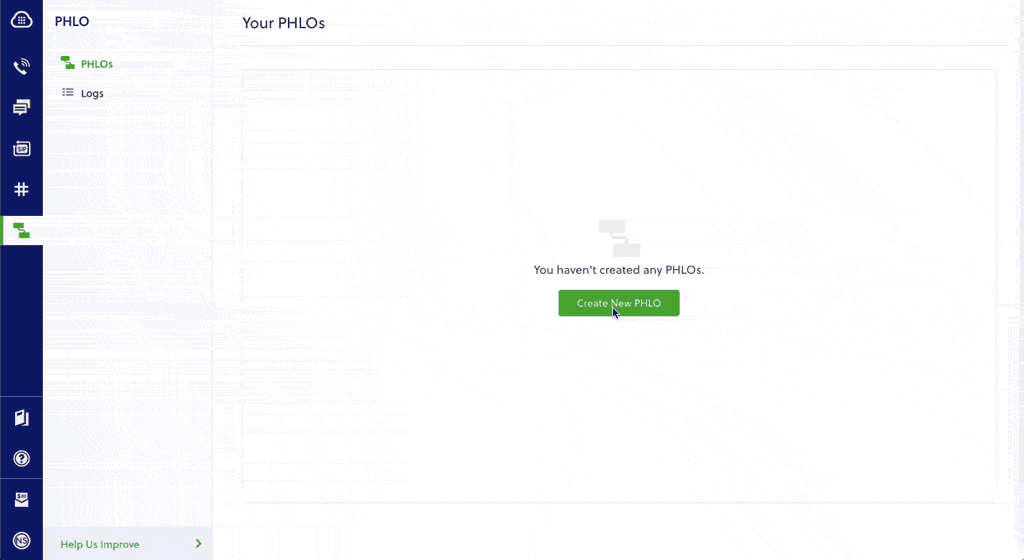
- Click Create New PHLO.
-
In the Choose your use case pop-up, click Build my own. The PHLO canvas will appear with the Start node.
Note: The Start node is the starting point of any PHLO. It lets you trigger a PHLO to start upon one of three actions: incoming SMS message, incoming call, or API request.
- From the list of components on the left side, drag and drop the Initiate Call component onto the canvas. When a component is placed on the canvas it becomes a node.
- Draw a line to connect the Start node’s API Request trigger state to the Initiate Call node.
-
In the Configuration pane at the right of the canvas, configure the Initiate Call node with a caller ID in the From field. Enter the destination number you wish to call in the To field.
Note: You can define a static payload by specifying values when you create the PHLO, or define a dynamic payload by passing values through Liquidtemplating parameters when you trigger the PHLO from your application.
- Once you’ve configured the node, click Validate to save the configuration.
- Similarly, create a node from the Play Audio component. Connect the Initiate Call node to the Play Audio node using the Answered trigger state.
- Configure the Play Audio node to play a message to the user by entering text in the Speak Text box in the Prompt section of the Configuration pane — for example, “Hello, you just received your first call.”
- Connect the Initiate Call node’s Answered trigger state to the Play Audio node.
- After you complete the configuration, give the PHLO a name by clicking in the upper left, then click Save.
Trigger the PHLO
You integrate a PHLO into your application workflow by making an API request to trigger the PHLO with the required payload — the set of parameters you pass to the PHLO. You can define a static payload by specifying values when you create the PHLO, or define a dynamic payload by passing values through parameters when you trigger the PHLO from your application.In either case, you need your Auth ID and Auth Token, which you can get from the overview page of the Plivo console.
With a static payload
When you configure values when creating the PHLO, they act as a static payload.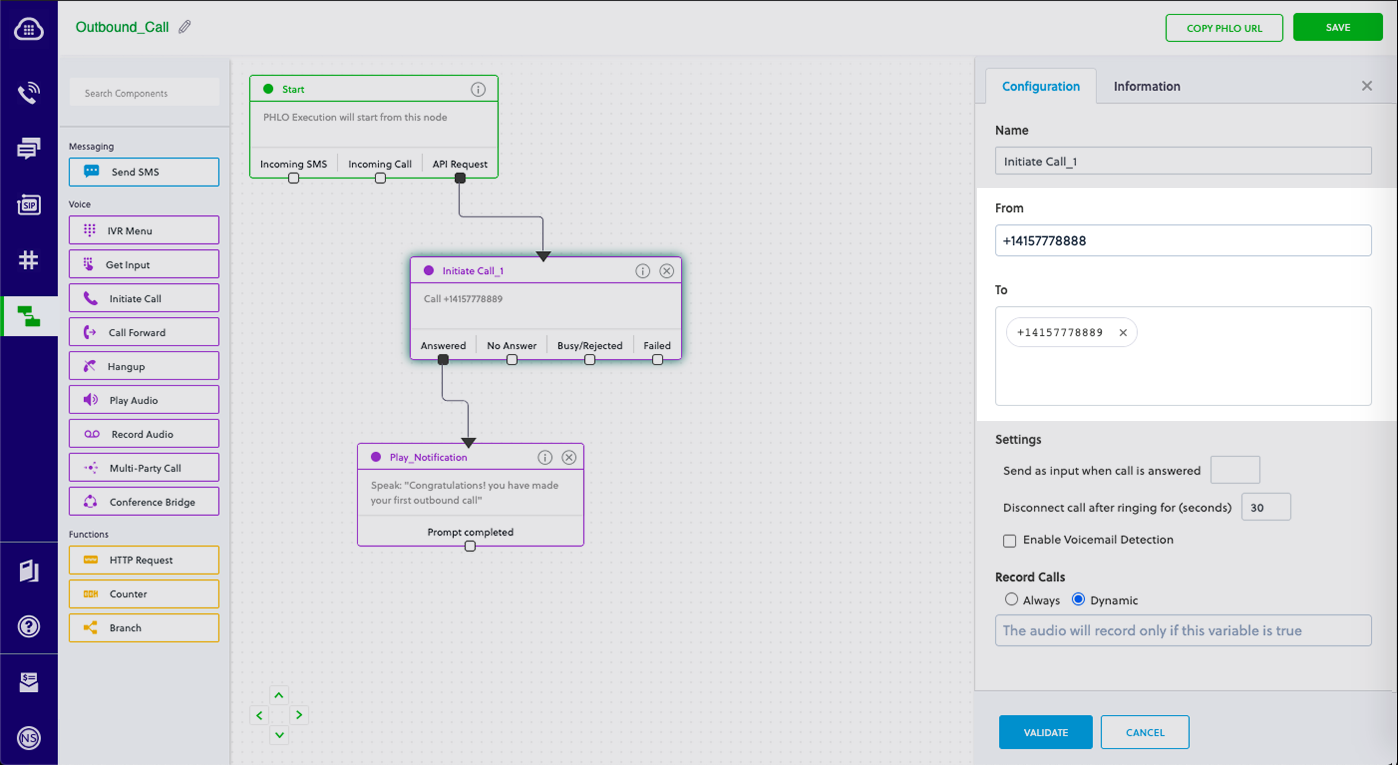
Code
Create a file calledtrigger_phlo.py and paste into it this code.Copy
Ask AI
import plivo

auth_id = '<auth_id>'
auth_token = '<auth_token>'
phlo_id = '<phlo_id>'
phlo_client = plivo.phlo.RestClient(auth_id=auth_id, auth_token=auth_token)
phlo = phlo_client.phlo.get(phlo_id)
response = phlo.run()
print str(response)
With a dynamic payload
To use dynamic values for the parameters, use Liquid templating parameters when you create the PHLO and pass the values from your code when you trigger it.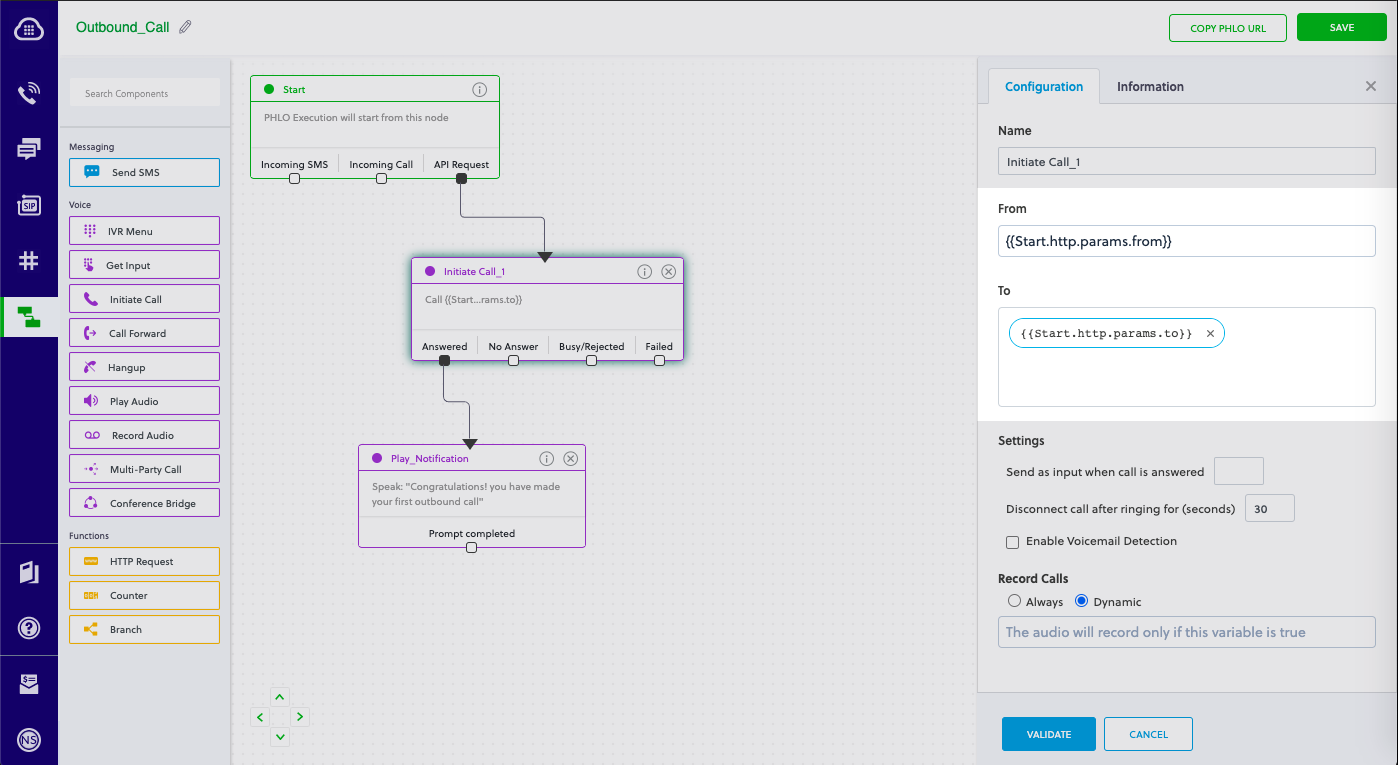
Code
Create a file calledtrigger_phlo.py and paste into it this code.Copy
Ask AI
import plivo

auth_id = '<auth_id>'
auth_token = '<auth_token>'
phlo_id = '<phlo_id>'
payload = {"from" : "<caller_id>","to" : "<destination_number>"}
phlo_client = plivo.phlo.RestClient(auth_id=auth_id, auth_token=auth_token)
phlo = phlo_client.phlo.get(phlo_id)
response = phlo.run(**payload)
print str(response)
Test
Save the file and run it.Copy
Ask AI
$ python trigger_phlo.py
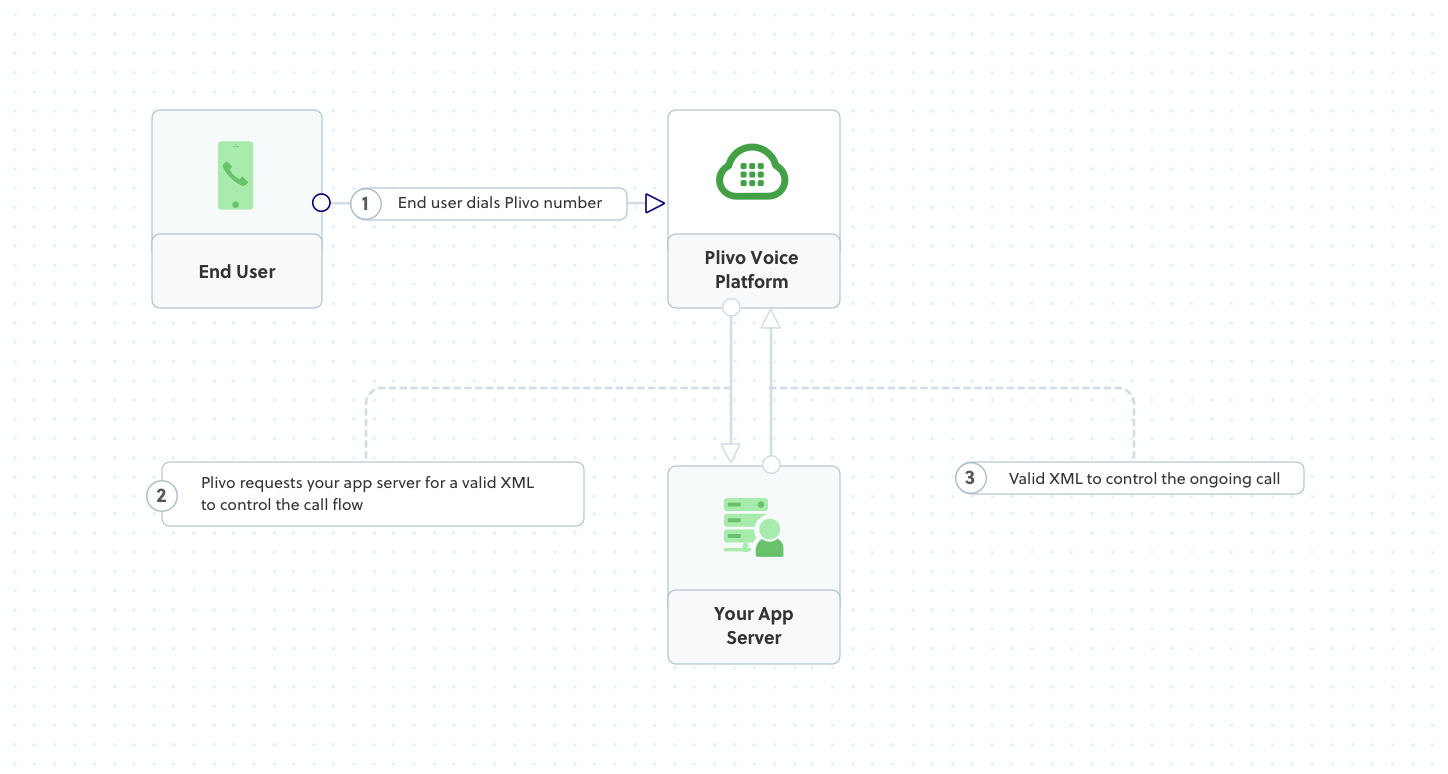
Receive your first inbound call
You can create and deploy a PHLO to receive an inbound call with a few clicks on the PHLO canvas, without writing a single line of code.Prerequisite
To receive incoming calls, you must have a voice-enabled Plivo phone number. You can rent numbers from the Numbers page of the Plivo console, or by using the Numbers API.Create the PHLO
To create a PHLO, visit the PHLO page of the Plivo console. If this is your first PHLO, the PHLO page will be empty.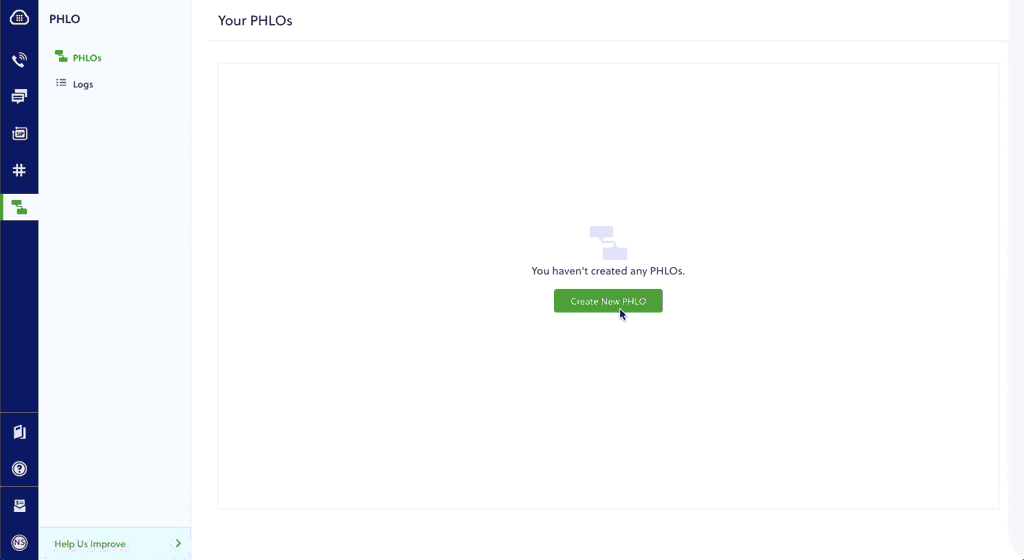
- Click Create New PHLO.
-
In the Choose your use case pop-up, click Build my own. The PHLO canvas will appear with the Start node.
Note: The Start node is the starting point of any PHLO. It lets you trigger a PHLO to start upon one of three actions: incoming SMS message, incoming call, or API request.
- From the list of components on the left side, drag and drop the Play Audio component onto the canvas. When a component is placed on the canvas it becomes a node.
- Draw a line to connect the Start node’s Incoming Call trigger state to the Play Audio node.
- In the Configuration pane at the right of the canvas, configure the Play Audio node to play a message to the caller.
- Once you’ve configured the node, click Validate to save the configuration.
- Give the PHLO a name by clicking in the upper left, then click Save.
Assign the PHLO to a Plivo number
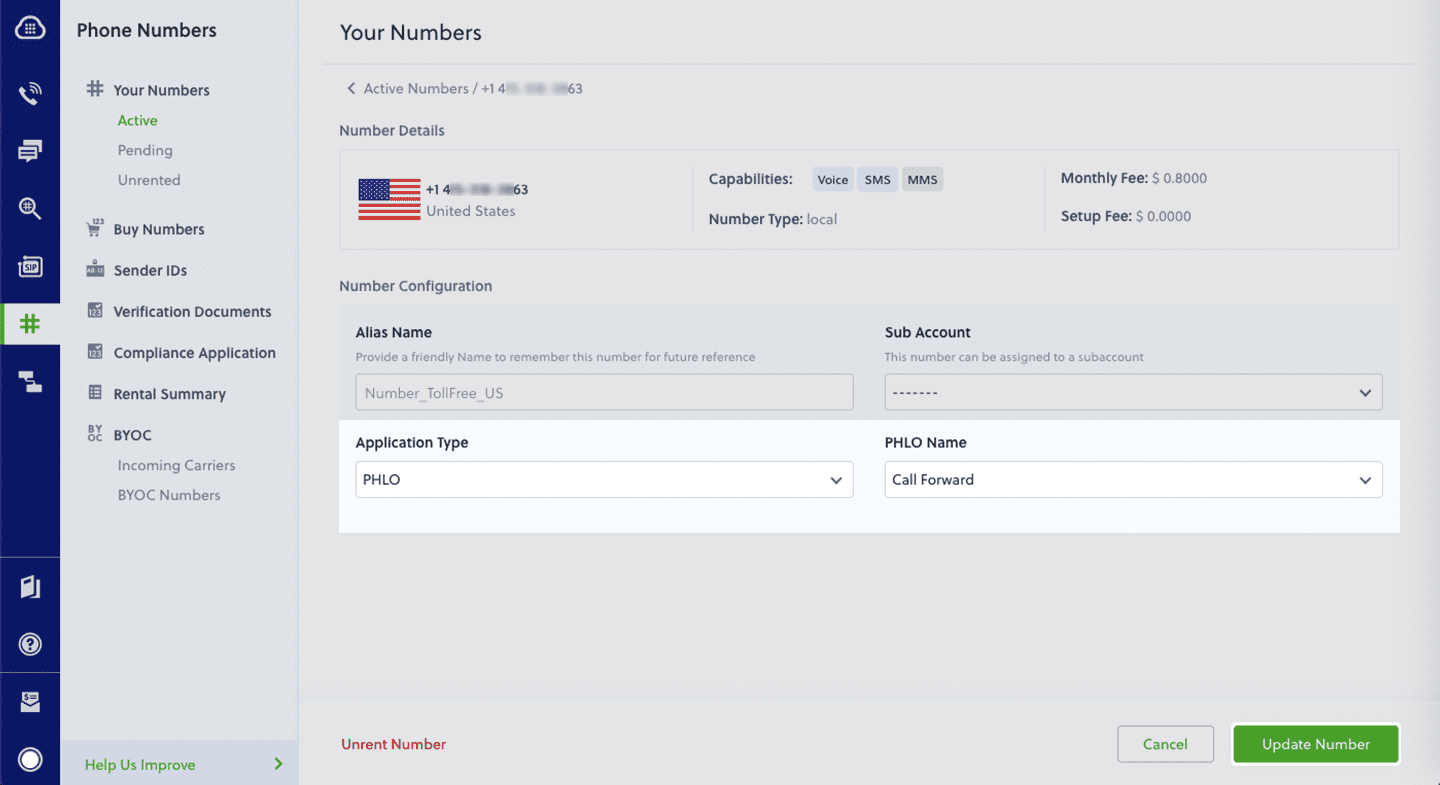
Once you’ve created and configured your PHLO, assign it to a Plivo number.- On the Numbers page of the console, under Your Numbers, click the phone number you want to use for the PHLO.
- In the Number Configuration box, select PHLO from the Application Type drop-down.
- From the PHLO Name drop-down, select the PHLO you want to use with the number, then click Update Number.

Test
You can now make a call to your Plivo phone number and see how the inbound call is handled.For more information about creating a PHLO application, see the PHLO Getting Started guide. For information on components and their variables, see the PHLO Components Library.Forward an inbound call
You can create and deploy a workflow to implement call forwarding with a few clicks on the PHLO canvas.Prerequisite
To receive incoming calls, you must have a voice-enabled Plivo phone number. You can rent numbers from the Numbers page of the Plivo console, or by using the Numbers API.Create the PHLO
To create a PHLO, visit the PHLO page of the Plivo console. If this is your first PHLO, the PHLO page will be empty.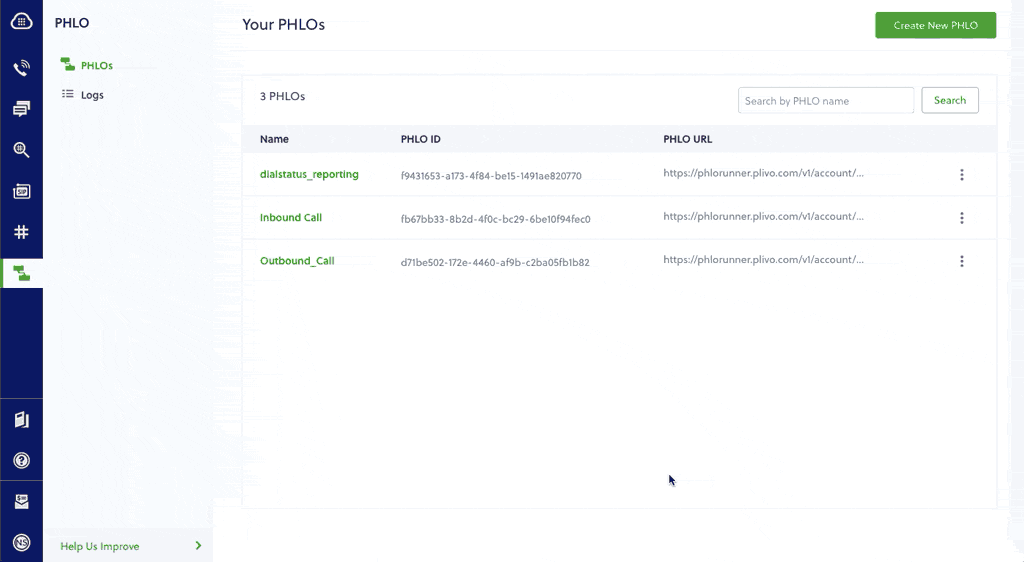
- Click Create New PHLO.
-
In the Choose your use case pop-up, click Build my own. The PHLO canvas will appear with the Start node.
Note: The Start node is the starting point of any PHLO. It lets you trigger a PHLO to start upon one of three actions: incoming SMS message, incoming call, or API request.
- From the list of components on the left side, drag and drop the Call Forward component onto the canvas. When a component is placed on the canvas it becomes a node.
-
Draw a line to connect the Start node‘s Incoming Call trigger state to the Call Forward node.
-
In the Configuration tab at the right of the canvas, configure the Call Forward node to select the From number using a variable. Enter two curly brackets to view all available variables, and choose the appropriate one. Enter all the numbers you want to call in the To field, separated with commas.
- Once you’ve configured the node, click Validate to save the configuration.
- Give the PHLO a name by clicking in the upper left, then click Save.
Assign the PHLO to a Plivo number
Once you’ve created and configured your PHLO, assign your PHLO to a Plivo number.- On the Numbers page of the console, under Your Numbers, click the phone number you want to use for the PHLO.
- In the Number Configuration box, select PHLO from the Application Type drop-down.
- From the PHLO Name drop-down, select the PHLO you want to use with the phone number, then click Update Number.
Test
You can now call your Plivo phone number and see how the inbound call is forwarded.For more information about creating a PHLO application, see the PHLO Getting Started guide. For information on components and their variables, see the PHLO Components Library.More use cases
We illustrate more than 20 use cases with code for both PHLO and API/XML on our documentation pages.Install Python, Flask, and the Plivo Python SDK
You must set up and install Python, Flask, and Plivo’s Python SDK before you make your first call.Install Python
Download and install Python from its official site.Install Flask and the Plivo Python SDK
Create a projects directory and change into it.Copy
Ask AI
$ mkdir mypythonapp
$ cd mypythonapp
Copy
Ask AI
$ pip install flask plivo
Copy
Ask AI
$ python setup.py install
Make your first outbound call
Copy
Ask AI
<Response>
<Speak>Congratulations! You've made your first outbound call!</Speak>
</Response>
Set up a Flask server to handle outbound calls
Create a file calledmakecall.py and paste into it this code.Copy
Ask AI
import plivo

client = plivo.RestClient('<auth_id>','<auth_token>')
response = client.calls.create(
    from_='<caller_id>',
    to_='<destination_number>',
    answer_url='https://s3.amazonaws.com/static.plivo.com/answer.xml',
    answer_method='GET', )
print(response)
Note:
We recommend that you store your credentials in the
auth_id and auth_token environment variables to avoid the possibility of accidentally committing them to source control. If you do this, you can initialize the client with no arguments and Plivo will automatically fetch the values from the environment variables. You can use os.environ to store environment variables and retrieve them when initializing the client.Test
Save the file and run your code.Copy
Ask AI
$ python makecall.py
Receive your first inbound call
Set up a Flask server to handle incoming calls
Create a file calledreceive_call.py and paste into it this code.Copy
Ask AI
from flask import Flask, Response
from plivo import plivoxml
app = Flask(__name__)
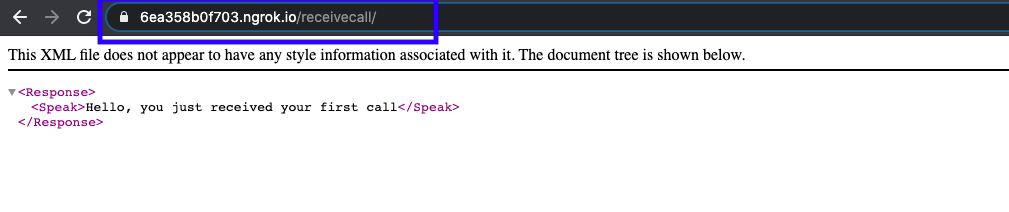
@app.route('/receive_call/', methods=['GET','POST'])
def speak_xml():
# Generate a Speak XML document with the details of the text to play on the call
response = (plivoxml.ResponseElement()
.add(plivoxml.SpeakElement('Hello, you just received your first call')))
return Response(response.to_string(), mimetype='application/xml')
if __name__ == "__main__":
app.run(host='0.0.0.0', debug=True)
Copy
Ask AI
$ python receive_call.py
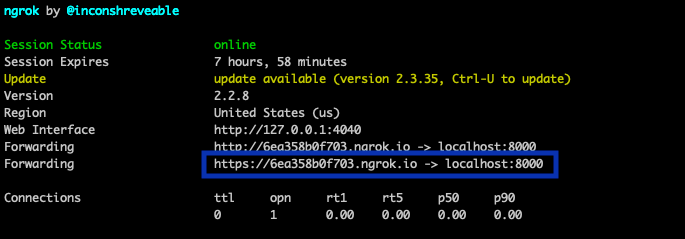
Expose your local server to the internet
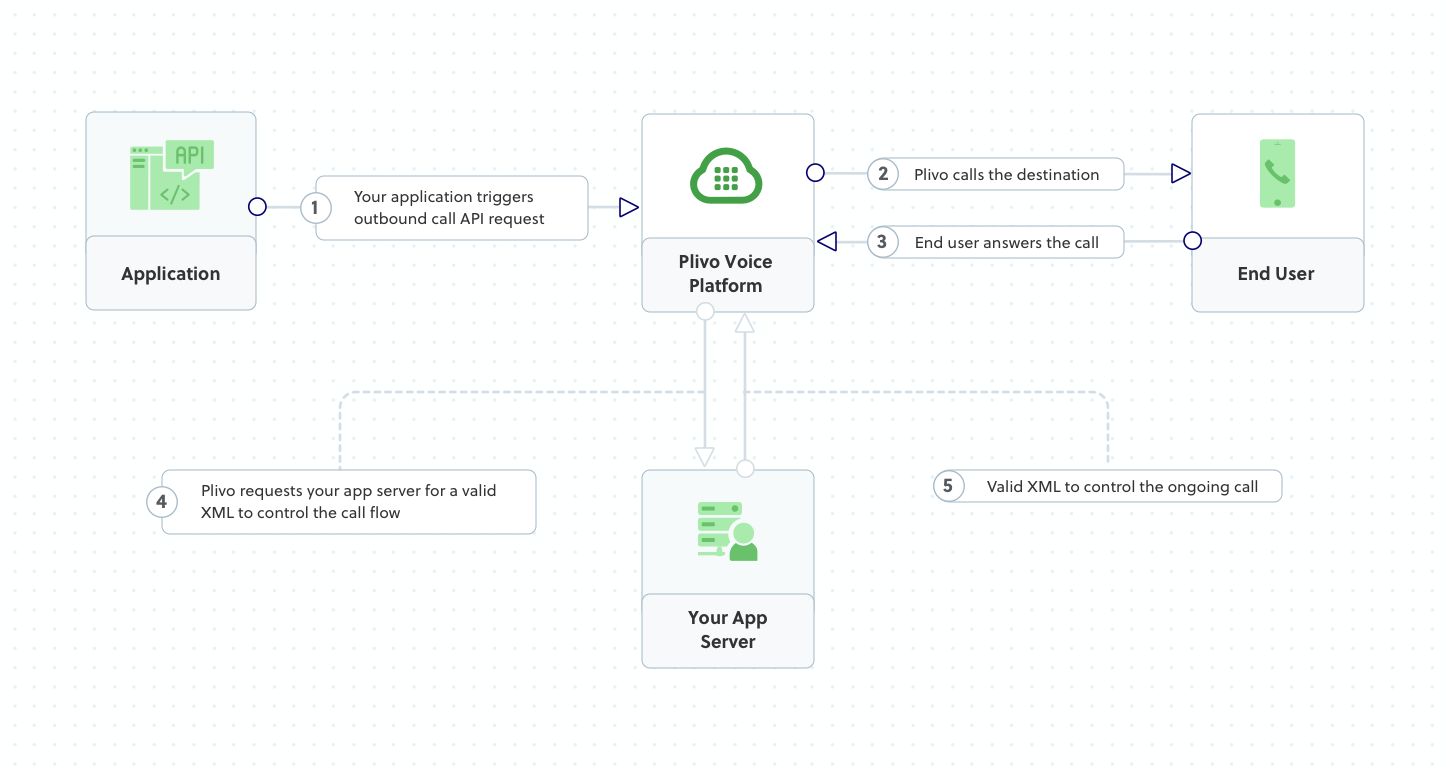
To receive incoming calls, your local server must connect with Plivo API services. For that, we recommend using ngrok, which exposes local servers running behind NATs and firewalls to the public internet over secure tunnels. Using ngrok, you can set webhooks that can talk to the Plivo server.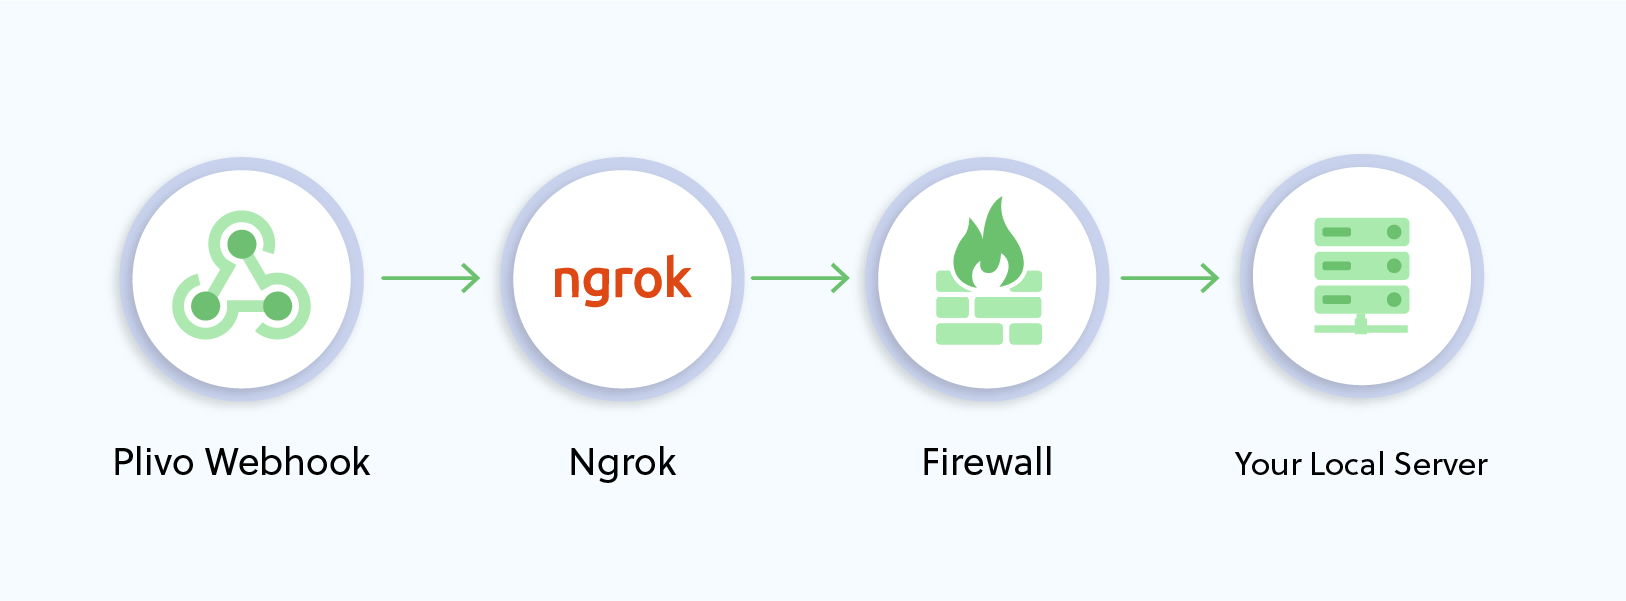
Copy
Ask AI
./ngrok http 8000
Create a Plivo application to receive calls
Associate the Flask server you created with Plivo by creating a Plivo application. Visit Voice > Applications and click Add New Application. You can also use Plivo’s Application API.Give your application a name — we called oursReceive_call. Enter the server URL you want to use (for example https://<yourdomain>.com/receive_call.php/) in the Primary Answer URL field and set the method to POST. Click Create Application to save your application.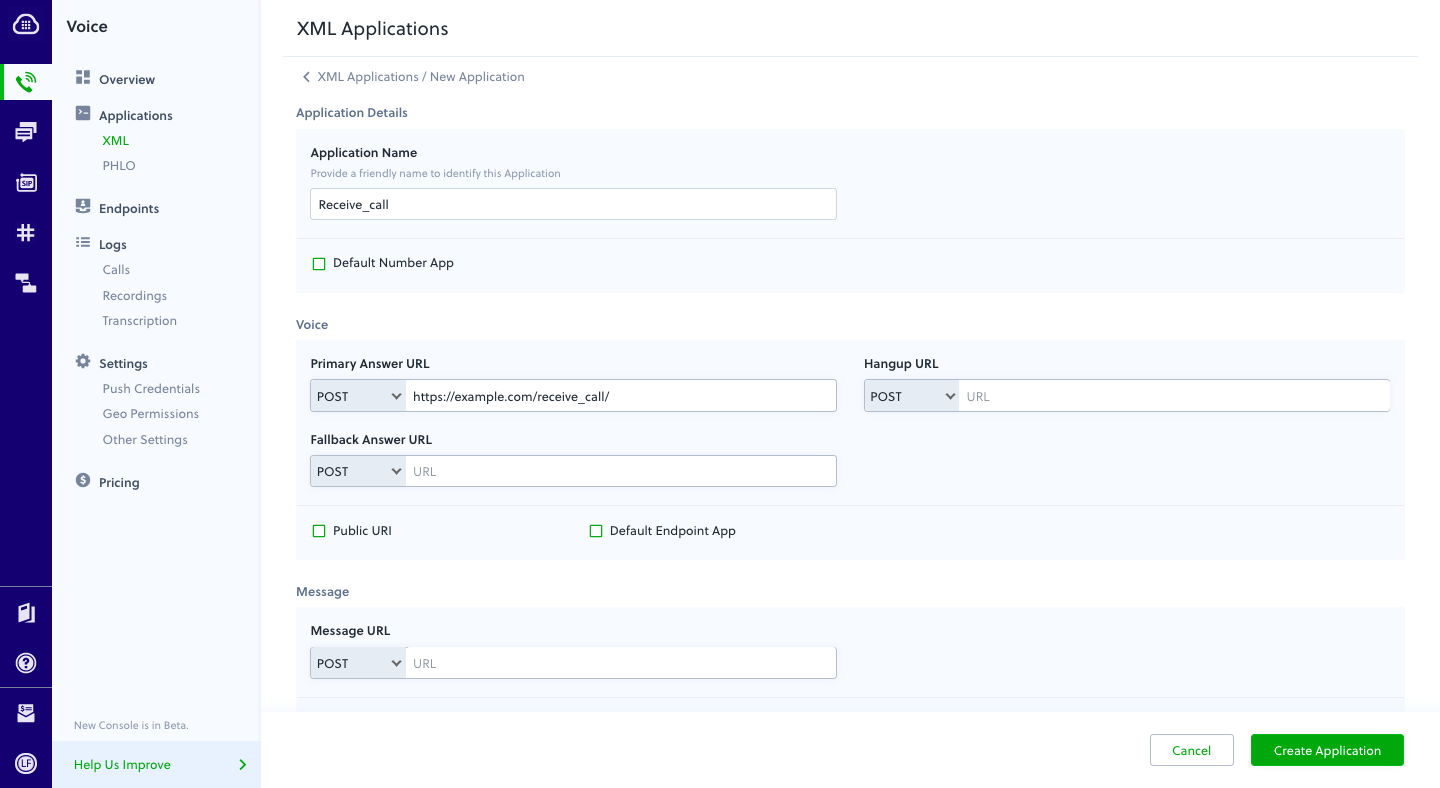
Assign a Plivo number to your application
Navigate to the Numbers page and select the phone number you want to use for this application.From the Application Type drop-down, selectXML Application.From the Plivo Application drop-down, select Receive_call (the name we gave the application).Click Update Number to save.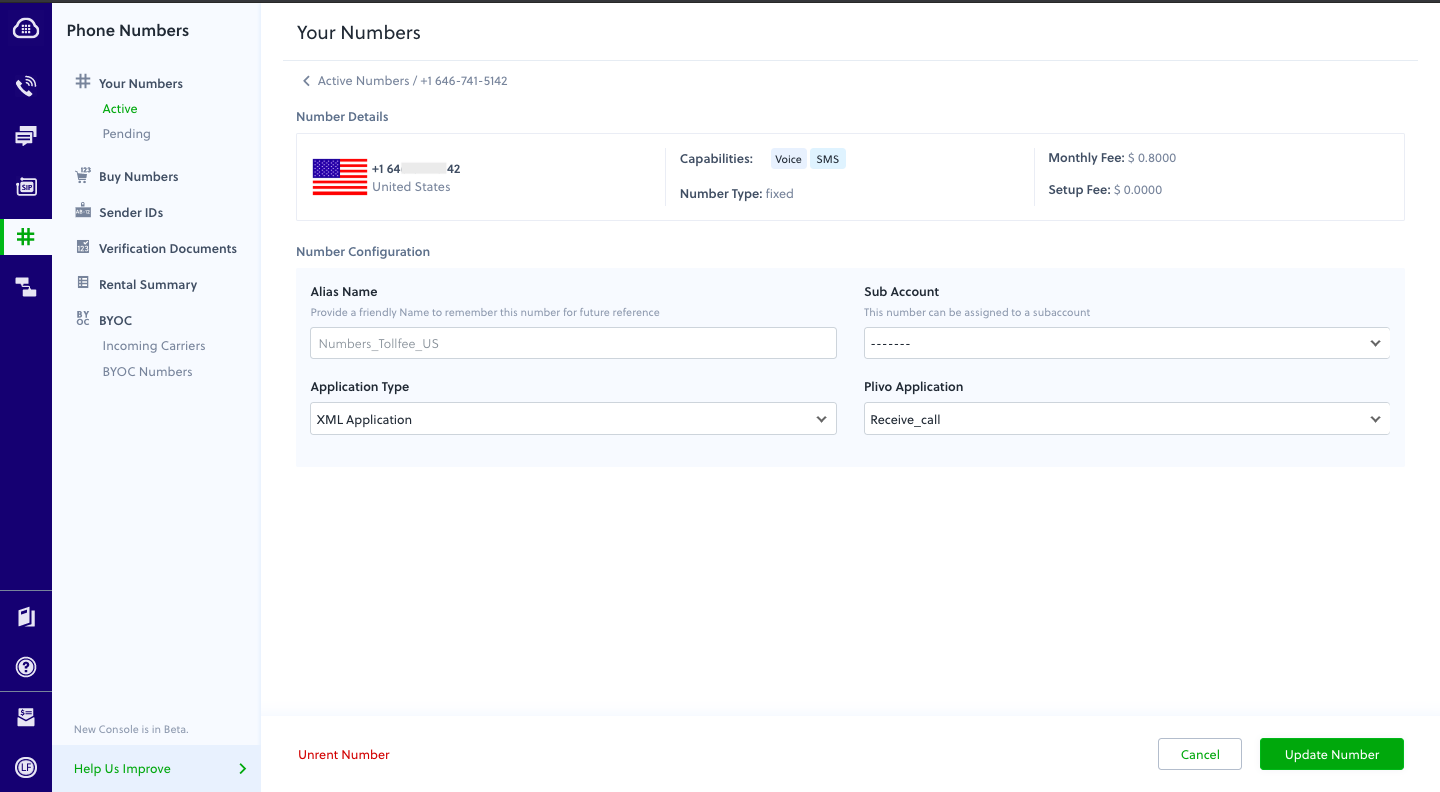
Test
Make a call to your Plivo number using any phone.Forward an incoming call
Set up a Flask server to forward calls
Create a file calledforward_call.py and paste into it this code.Copy
Ask AI
from flask import Flask, request, make_response, Response
from plivo import plivoxml

app = Flask(__name__)

@app.route('/forward_call/', methods=['GET', 'POST'])
def forwardcall():

    response = plivoxml.ResponseElement()
    response.add(
        plivoxml.DialElement().add(
            plivoxml.NumberElement('<destination_number>')))
    return(response.to_string())

if __name__ == '__main__':
    app.run(host='0.0.0.0', debug=True)
Create a Plivo application to forward calls
Associate the Flask server you created with Plivo by creating a Plivo application. Visit Voice > Applications in the Plivo console and click on Add New Application, or use Plivo’s Application API.Give your application a name — we called oursForward Call. Enter the server URL you want to use (for example https://<yourdomain>.com/forward_call/) in the Answer URL field and set the method to POST. Click Create Application to save your application.Assign a Plivo number to your application
Navigate to the Numbers page and select the phone number you want to use for this application.From the Application Type drop-down, selectXML Application.From the Plivo Application drop-down, select Forward Call (the name we gave the application).Click Update Number to save.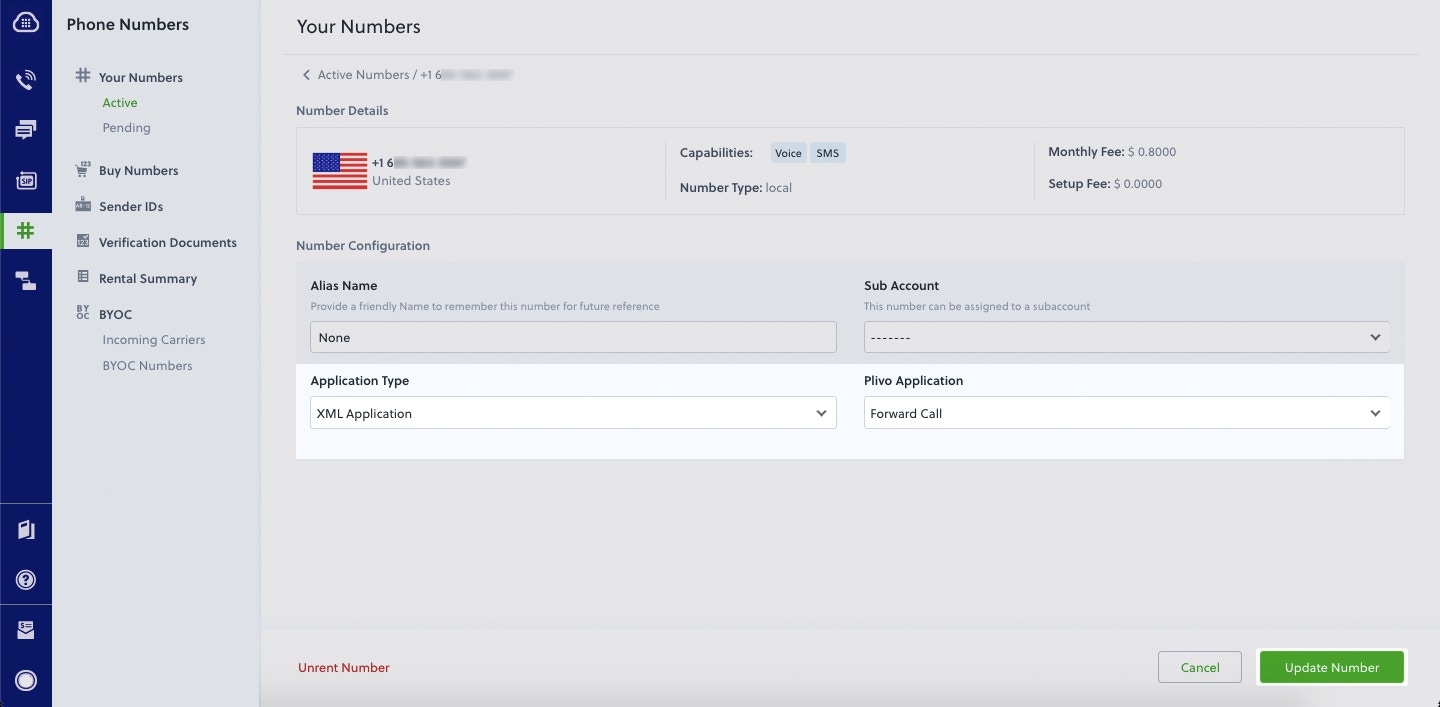
Test
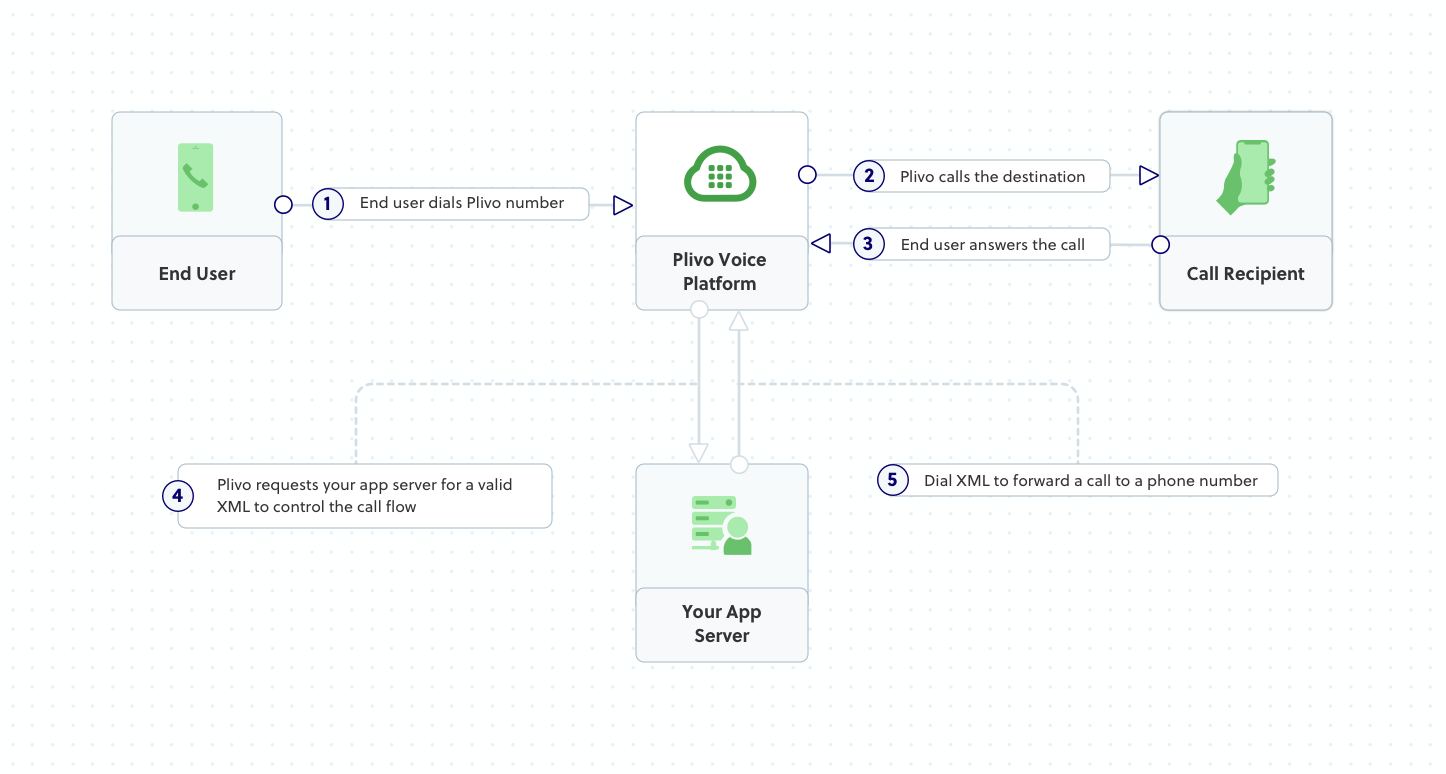
Make a call to your Plivo number using any phone. Plivo will send a request to the answer URL you provided requesting an XML response and then forward the call according to the instructions in the XML document the server provides.More use cases
We illustrate more than 20 use cases with code for both API/XML and PHLO on our documentation pages.Get Started with Python Using Django Framework
Start by signing up for a free trial account that you can use to experiment with and learn about our services. The free trial account comes with free credits, and you can add more as you go along. You can also add a phone number to your account to start testing the full range of our voice and SMS features. A page in our support portal walks you through the signup process.You can start making and receiving calls either by using our PHLO visual workflow builder or our APIs and XML documents. Follow the instructions in one of the tabs below.- Using PHLO
- Using XML
Set up your Python Django dev environment
You must set up and install Python, Django, and Plivo’s Python SDK before you make your first call.Install Python
Download and install Python from its official site.Install Django and the Plivo Python SDK
Create a projects directory and change into it.Copy
Ask AI
$ mkdir mydjangoapp
$ cd mydjangoapp
Copy
Ask AI
$ pip3 install django plivo
sudo with your commands and overwriting dependencies.Create a Django project
Start a new Django project.Copy
Ask AI
$ django-admin startproject VoiceProj
Make your first outbound call
You can create and deploy a PHLO to make an outbound call with a few clicks on the PHLO canvas, and trigger it with some simple code.Create the PHLO
To create a PHLO, visit the PHLO page of the Plivo console. If this is your first PHLO, the PHLO page will be empty.- Click Create New PHLO.
-
In the Choose your use case pop-up, click Build my own. The PHLO canvas will appear with the Start node.
Note:The Start node is the starting point of any PHLO. It lets you trigger a PHLO to start upon one of three actions: incoming SMS message, incoming call, or API request.
- From the list of components on the left side, drag and drop the Initiate Call component onto the canvas. When a component is placed on the canvas it becomes a node.
- Draw a line to connect the Start node’s API Request trigger state to the Initiate Call node.
-
In the Configuration pane at the right of the canvas, configure the Initiate Call node with a caller ID in the From field. Enter the destination number you wish to call in the To field.
Note: You can define a static payload by specifying values when you create the PHLO, or define a dynamic payload by passing values through Liquidtemplating parameters when you trigger the PHLO from your application.
- Once you’ve configured the node, click Validate to save the configuration.
- Similarly, create a node from the Play Audio component. Connect the Initiate Call node to the Play Audio node using the Answered trigger state.
- Configure the Play Audio node to play a message to the user by entering text in the Speak Text box in the Prompt section of the Configuration pane — for example, “Hello, you just received your first call.”
- Connect the Initiate Call node’s Answered trigger state to the Play Audio node.
- After you complete the configuration, give the PHLO a name by clicking in the upper left, then click Save.
Trigger the PHLO
You integrate a PHLO into your application workflow by making an API request to trigger the PHLO with the required payload — the set of parameters you pass to the PHLO. You can define a static payload by specifying values when you create the PHLO, or define a dynamic payload by passing values through parameters when you trigger the PHLO from your application.In either case, you need your Auth ID and Auth Token, which you can get from the overview page of the Plivo console.Copy
Ask AI
$ python manage.py startapp outboundcall
With a static payload
When you configure values when creating the PHLO, they act as a static payload.Code
Editoutboundcall/views.py and paste into it this code.Copy
Ask AI
from django.conf import settings
from django.http import HttpResponse
from django.views.decorators.csrf import csrf_exempt
import plivo

@csrf_exempt
def outboundcall_response(request):

  auth_id = '<auth_id>'
  auth_token = '<auth_token>'
  phlo_id = '<phlo_id>'
  phlo_client = plivo.phlo.RestClient(auth_id=auth_id, auth_token=auth_token)
  phlo = phlo_client.phlo.get(phlo_id)
  response = phlo.run()
  return HttpResponse(response)
With a dynamic payload
To use dynamic values for the parameters, use Liquid templating parameters when you create the PHLO and pass the values from your code when you trigger it.Code
Editoutboundcall/views.py and paste into it this code.Copy
Ask AI
from django.conf import settings
from django.http import HttpResponse
from django.views.decorators.csrf import csrf_exempt
import plivo

@csrf_exempt
def outboundcall_response(request):
  auth_id = '<auth_id>'
  auth_token = '<auth_token>'
  phlo_id = '<phlo_id>'
  payload = {"from" : "<caller_id>","to" : "<destination_number>"}
  phlo_client = plivo.phlo.RestClient(auth_id=auth_id, auth_token=auth_token)
  phlo = phlo_client.phlo.get(phlo_id)
  response = phlo.run(**payload)
  return HttpResponse(response)
Add a route
Create a file called outboundcall/urls.py and paste into it this code.Copy
Ask AI
from django.conf.urls import url
from . import views
urlpatterns = [
   url(r'^$', views.outboundcall_response, name='outboundcall'),
]
Copy
Ask AI
from django.conf.urls import include, url
from django.contrib import admin

urlpatterns = [
   url(r'^outboundcall/', include('outboundcall.urls')),
   url(r'^admin/', admin.site.urls),
   ]
Test
Run your code.Copy
Ask AI
$ python manage.py runserver
Receive your first inbound call
You can create and deploy a PHLO to receive an inbound call with a few clicks on the PHLO canvas, without writing a single line of code.Prerequisite
To receive incoming calls, you must have a voice-enabled Plivo phone number. You can rent numbers from the Numbers page of the Plivo console, or by using the Numbers API.Create the PHLO
To create a PHLO, visit the PHLO page of the Plivo console. If this is your first PHLO, the PHLO page will be empty.- Click Create New PHLO.
-
In the Choose your use case pop-up, click Build my own. The PHLO canvas will appear with the Start node.
Note: The Start node is the starting point of any PHLO. It lets you trigger a PHLO to start upon one of three actions: incoming SMS message, incoming call, or API request.
- From the list of components on the left side, drag and drop the Play Audio component onto the canvas. When a component is placed on the canvas it becomes a node.
- Draw a line to connect the Start node’s Incoming Call trigger state to the Play Audio node.
- In the Configuration pane at the right of the canvas, configure the Play Audio node to play a message to the caller.
- Once you’ve configured the node, click Validate to save the configuration.
- Give the PHLO a name by clicking in the upper left, then click Save.
Assign the PHLO to a Plivo number
Once you’ve created and configured your PHLO, assign it to a Plivo number.- On the Numbers page of the console, under Your Numbers, click the phone number you want to use for the PHLO.
- In the Number Configuration box, select PHLO from the Application Type drop-down.
- From the PHLO Name drop-down, select the PHLO you want to use with the number, then click Update Number.
Test
You can now make a call to your Plivo phone number and see how the inbound call is handled.For more information about creating a PHLO application, see the PHLO Getting Started guide. For information on components and their variables, see the PHLO Components Library.Forward an inbound call
You can create and deploy a workflow to implement call forwarding with a few clicks on the PHLO canvas.Prerequisite
To receive incoming calls, you must have a voice-enabled Plivo phone number. You can rent numbers from the Numbers page of the Plivo console, or by using the Numbers API.Create the PHLO
To create a PHLO, visit the PHLO page of the Plivo console. If this is your first PHLO, the PHLO page will be empty.- Click Create New PHLO.
-
In the Choose your use case pop-up, click Build my own. The PHLO canvas will appear with the Start node.
Note: The Start node is the starting point of any PHLO. It lets you trigger a PHLO to start upon one of three actions: incoming SMS message, incoming call, or API request.
- From the list of components on the left side, drag and drop the Call Forward component onto the canvas. When a component is placed on the canvas it becomes a node.
-
Draw a line to connect the Start node‘s Incoming Call trigger state to the Call Forward node.
-
In the Configuration tab at the right of the canvas, configure the Call Forward node to select the From number using a variable. Enter two curly brackets to view all available variables, and choose the appropriate one. Enter all the numbers you want to call in the To field, separated with commas.
- Once you’ve configured the node, click Validate to save the configuration.
- Give the PHLO a name by clicking in the upper left, then click Save.
Assign the PHLO to a Plivo number
Once you’ve created and configured your PHLO, assign your PHLO to a Plivo number.- On the Numbers page of the console, under Your Numbers, click the phone number you want to use for the PHLO.
- In the Number Configuration box, select PHLO from the Application Type drop-down.
- From the PHLO Name drop-down, select the PHLO you want to use with the phone number, then click Update Number.
Test
You can now call your Plivo phone number and see how the inbound call is forwarded.For more information about creating a PHLO application, see the PHLO Getting Started guide. For information on components and their variables, see the PHLO Components Library.More use cases
We illustrate more than 20 use cases with code for both PHLO and API/XML on our documentation pages.Install Python, Django, and the Plivo Python SDK
You must set up and install Python, Django, and Plivo’s Python SDK before you make your first call.Install Python
Download and install Python from its official site.Install Django and the Plivo Python SDK
Create a projects directory and change into it.Copy
Ask AI
$ mkdir mydjangoapps
$ cd mydjangoapps
Copy
Ask AI
$ pip install django plivo
Make your first outbound call
Copy
Ask AI
<Response>
<Speak>Congratulations! You've made your first outbound call!</Speak>
</Response>
Create a Django project
Use django-admin to auto-generate code for a Django project.Copy
Ask AI
$ django-admin startproject VoiceProj
Create a Django app for outbound calls
Change to the new directory and create a Django app for outbound calls.Copy
Ask AI
$ python manage.py startapp outboundcall
outboundcall/views.py and paste into it this code.Copy
Ask AI
from django.conf import settings
from django.http import HttpResponse
from django.views.decorators.csrf import csrf_exempt
import plivo

@csrf_exempt
def outboundcall_response(request):

   client = plivo.RestClient(settings.<auth_id>, settings.<auth_token>)
   response = client.calls.create(
       from_=settings.<caller_id>,
       to_='<destination_number>',
       answer_url='https://s3.amazonaws.com/static.plivo.com/answer.xml',
       answer_method='GET', )
   return HttpResponse(response)
Note:
We recommend that you store your credentials in the
auth_id and auth_token environment variables to avoid the possibility of accidentally committing them to source control. If you do this, you can initialize the client with no arguments and Plivo will automatically fetch the values from the environment variables. You can use os.environ to store environment variables and retrieve them when initializing the client.Add a route
Create the fileoutboundcall/urls.py and paste into it this code.Copy
Ask AI
from django.conf.urls import url
from . import views
urlpatterns = [
   url(r'^$', views.outboundcall_response, name='outboundcall'),
]
VoiceProj/urls.py and paste into it this code.Copy
Ask AI
from django.conf.urls import include, url
from django.contrib import admin

urlpatterns = [
   url(r'^outboundcall/', include('outboundcall.urls')),
   url(r'^admin/', admin.site.urls),
   ]
Test
Run your code.Copy
Ask AI
$ python manage.py runserver
Receive your first inbound call
Create a Django app to handle incoming calls
Change to the VoiceProj directory and create a Django app to handle incoming calls.Copy
Ask AI
$ python manage.py startapp receivecall
receivecall/views.py and paste into it this code.Copy
Ask AI
from django.conf import settings
from django.http import HttpResponse
from django.views.decorators.csrf import csrf_exempt
from plivo import plivoxml

@csrf_exempt
def receivecall_response(request):

   # Generate a Speak XML document with the details of the text to play on the call
   response = (plivoxml.ResponseElement()
           .add(plivoxml.SpeakElement('Hello, you just received your first call')))
   return HttpResponse(response.to_string(), content_type='text/xml')
Add a route
Create the filereceivecall/urls.py and paste into it this code.Copy
Ask AI
from django.conf.urls import url
from . import views
urlpatterns = [
   url(r'^$', views.receivecall_response, name='receivecall'),
]
VoiceProj/urls.py and paste into it this code.Copy
Ask AI
from django.conf.urls import include, url
from django.contrib import admin

urlpatterns = [
   url(r'^outboundcall/', include('outboundcall.urls')),
   url(r'^receivecall/', include('receivecall.urls')),
   url(r'^admin/', admin.site.urls),
   ]
Copy
Ask AI
$ python3 manage.py runserver
Expose your local server to the internet
To receive incoming calls, your local server must connect with Plivo API services. For that, we recommend using ngrok, which exposes local servers running behind NATs and firewalls to the public internet over secure tunnels. Using ngrok, you can set webhooks that can talk to the Plivo server.Note: Before starting the service, add ngrok in the allowed hosts list in the settings.py file in your project.
Copy
Ask AI
ALLOWED_HOSTS = ['.ngrok.io']
Copy
Ask AI
./ngrok http 8000
Create a Plivo application to receive calls
Associate the Django app you created with Plivo by creating a Plivo application. Visit Voice > Applications and click Add New Application. You can also use Plivo’s Application API.Give your application a name — we called oursReceive_call. Enter the server URL you want to use (for example https://<yourdomain>.com/receive_call.php/) in the Primary Answer URL field and set the method to POST. Click Create Application to save your application.Assign a Plivo number to your application
Navigate to the Numbers page and select the phone number you want to use for this application.From the Application Type drop-down, selectXML Application.From the Plivo Application drop-down, select Receive_call (the name we gave the application).Click Update Number to save.Test
Make a call to your Plivo number using any phone.Forward an incoming call
Create a Django app to forward calls
Change to the VoiceProj directory and create a Django app to forward incoming calls.Copy
Ask AI
$ python3 manage.py startapp forwardcall
forwardcall/views.py and paste into it this code.Copy
Ask AI
from django.conf import settings
from django.http import HttpResponse
from django.views.decorators.csrf import csrf_exempt
from plivo import plivoxml

@csrf_exempt
def forwardcall_response(request):

   # Generate a Dial XML forward the incoming call.
   response = plivoxml.ResponseElement()
    response.add(
        plivoxml.DialElement().add(
            plivoxml.NumberElement('<destination_number>')))
   return HttpResponse(response.to_string(), content_type='text/xml')
Add a route
Create the fileforwardcall/urls.py and paste into it this code.Copy
Ask AI
from django.conf.urls import url
from . import views
urlpatterns = [
   url(r'^$', views.forwardcall_response, name='forwardcall'),
]
VoiceProj/urls.py and paste into it this code.Copy
Ask AI
from django.conf.urls import include, url
from django.contrib import admin

urlpatterns = [
   url(r'^outboundcall/', include('outboundcall.urls')),
   url(r'^receivecall/', include('receivecall.urls')),
   url(r'^forwardcall/', include('forwardcall.urls')),
   url(r'^admin/', admin.site.urls),
   ]
Create a Plivo application to forward calls
Associate the Django app you created with Plivo by creating a Plivo application. Visit Voice > Applications in the Plivo console and click on Add New Application, or use Plivo’s Application API.Give your application a name — we called oursForward Call. Enter the server URL you want to use (for example https://<yourdomain>.com/forward_call/) in the Answer URL field and set the method to POST. Click Create Application to save your application.Assign a Plivo number to your application
Navigate to the Numbers page and select the phone number you want to use for this application.From the Application Type drop-down, selectXML Application.From the Plivo Application drop-down, select Forward Call (the name we gave the application).Click Update Number to save.Test
Make a call to your Plivo number using any phone. Plivo will send a request to the answer URL you provided requesting an XML response and then forward the call according to the instructions in the XML document the server provides.More use cases
We illustrate more than 20 use cases with code for both API/XML and PHLO on our documentation pages.Get Started with Python Using FastAPI Framework
Start by signing up for a free trial account that you can use to experiment with and learn about our services. The free trial account comes with free credits, and you can add more as you go along. You can also add a phone number to your account to start testing the full range of our voice and SMS features. A page in our support portal walks you through the signup process.You can start making and receiving calls either by using our PHLO visual workflow builder or our APIs and XML documents. Follow the instructions in one of the tabs below.- Using PHLO
- Using XML
Set up your Python FastAPI dev environment
You must set up and install Python, FastAPI, and Plivo’s Python SDK before you make your first call.Install Python
Download and install Python from its official site.Install FastAPI and the Plivo Python SDK
Create a projects directory and change into it.Copy
Ask AI
$ mkdir mypythonapp
$ cd mypythonapp
Copy
Ask AI
$ pip install fastapi
Copy
Ask AI
$ pip install uvicorn
Copy
Ask AI
$ pip install plivo
sudo with your commands and overwriting dependencies.Make your first outbound call
You can create and deploy a PHLO to make an outbound call with a few clicks on the PHLO canvas, and trigger it with some simple code.Create the PHLO
To create a PHLO, visit the PHLO page of the Plivo console. If this is your first PHLO, the PHLO page will be empty.- Click Create New PHLO.
-
In the Choose your use case pop-up, click Build my own. The PHLO canvas will appear with the Start node.
Note: The Start node is the starting point of any PHLO. It lets you trigger a PHLO to start upon one of three actions: incoming SMS message, incoming call, or API request.
- From the list of components on the left side, drag and drop the Initiate Call component onto the canvas. When a component is placed on the canvas it becomes a node.
- Draw a line to connect the Start node’s API Request trigger state to the Initiate Call node.
-
In the Configuration pane at the right of the canvas, configure the Initiate Call node with a caller ID in the From field. Enter the destination number you wish to call in the To field.
Note: You can define a static payload by specifying values when you create the PHLO, or define a dynamic payload by passing values through Liquidtemplating parameters when you trigger the PHLO from your application.
- Once you’ve configured the node, click Validate to save the configuration.
- Similarly, create a node from the Play Audio component. Connect the Initiate Call node to the Play Audio node using the Answered trigger state.
- Configure the Play Audio node to play a message to the user by entering text in the Speak Text box in the Prompt section of the Configuration pane — for example, “Hello, you just received your first call.”
- Connect the Initiate Call node’s Answered trigger state to the Play Audio node.
- After you complete the configuration, give the PHLO a name by clicking in the upper left, then click Save.
Trigger the PHLO
You integrate a PHLO into your application workflow by making an API request to trigger the PHLO with the required payload — the set of parameters you pass to the PHLO. You can define a static payload by specifying values when you create the PHLO, or define a dynamic payload by passing values through parameters when you trigger the PHLO from your application.In either case, you need your Auth ID and Auth Token, which you can get from the overview page of the Plivo console.With a static payload
When you configure values when creating the PHLO, they act as a static payload.Code
Create a file calledtrigger_phlo.py and paste into it this code.Copy
Ask AI
import plivo
from typing import Optional
from fastapi import FastAPI

app = FastAPI()

@app.get("/outbound/")
def make_call():

  auth_id = '<auth_id>'
  auth_token = '<auth_token>'
  phlo_id = '<phlo_id>'
  phlo_client = plivo.phlo.RestClient(auth_id=auth_id, auth_token=auth_token)
  phlo = phlo_client.phlo.get(phlo_id)
  response = phlo.run()
  return response
With a dynamic payload
To use dynamic values for the parameters, use Liquid templating parameters when you create the PHLO and pass the values from your code when you trigger it.Code
Create a file calledtrigger_phlo.py and paste into it this code.Copy
Ask AI
import plivo
from typing import Optional
from fastapi import FastAPI

app = FastAPI()

@app.get("/outbound/")
def make_call():
    auth_id = '<auth_id>'
    auth_token = '<auth_token>'
    phlo_id = '<phlo_id>'
    payload = {"from" : "<caller_id>","to" : "<destination_number>"}
    phlo_client = plivo.phlo.RestClient(auth_id=auth_id, auth_token=auth_token)
    phlo = phlo_client.phlo.get(phlo_id)
    response = phlo.run(**payload)
    return response
Test
Save the file and run your code.Copy
Ask AI
$ uvicorn trigger_phlo:app --reload
Receive your first inbound call
You can create and deploy a PHLO to receive an inbound call with a few clicks on the PHLO canvas, without writing a single line of code.Prerequisite
To receive incoming calls, you must have a voice-enabled Plivo phone number. You can rent numbers from the Numbers page of the Plivo console, or by using the Numbers API.Create the PHLO
To create a PHLO, visit the PHLO page of the Plivo console. If this is your first PHLO, the PHLO page will be empty.- Click Create New PHLO.
-
In the Choose your use case pop-up, click Build my own. The PHLO canvas will appear with the Start node.
Note: The Start node is the starting point of any PHLO. It lets you trigger a PHLO to start upon one of three actions: incoming SMS message, incoming call, or API request.
- From the list of components on the left side, drag and drop the Play Audio component onto the canvas. When a component is placed on the canvas it becomes a node.
- Draw a line to connect the Start node’s Incoming Call trigger state to the Play Audio node.
- In the Configuration pane at the right of the canvas, configure the Play Audio node to play a message to the caller.
- Once you’ve configured the node, click Validate to save the configuration.
- Give the PHLO a name by clicking in the upper left, then click Save.
Assign the PHLO to a Plivo number
Once you’ve created and configured your PHLO, assign it to a Plivo number.- On the Numbers page of the console, under Your Numbers, click the phone number you want to use for the PHLO.
- In the Number Configuration box, select PHLO from the Application Type drop-down.
- From the PHLO Name drop-down, select the PHLO you want to use with the number, then click Update Number.
Test
You can now make a call to your Plivo phone number and see how the inbound call is handled.For more information about creating a PHLO application, see the PHLO Getting Started guide. For information on components and their variables, see the PHLO Components Library.Forward an inbound call
You can create and deploy a workflow to implement call forwarding with a few clicks on the PHLO canvas.Prerequisite
To receive incoming calls, you must have a voice-enabled Plivo phone number. You can rent numbers from the Numbers page of the Plivo console, or by using the Numbers API.Create the PHLO
To create a PHLO, visit the PHLO page of the Plivo console. If this is your first PHLO, the PHLO page will be empty.- Click Create New PHLO.
-
In the Choose your use case pop-up, click Build my own. The PHLO canvas will appear with the Start node.
Note: The Start node is the starting point of any PHLO. It lets you trigger a PHLO to start upon one of three actions: incoming SMS message, incoming call, or API request.
- From the list of components on the left side, drag and drop the Call Forward component onto the canvas. When a component is placed on the canvas it becomes a node.
-
Draw a line to connect the Start node‘s Incoming Call trigger state to the Call Forward node.
-
In the Configuration tab at the right of the canvas, configure the Call Forward node to select the From number using a variable. Enter two curly brackets to view all available variables, and choose the appropriate one. Enter all the numbers you want to call in the To field, separated with commas.
- Once you’ve configured the node, click Validate to save the configuration.
- Give the PHLO a name by clicking in the upper left, then click Save.
Assign the PHLO to a Plivo number
Once you’ve created and configured your PHLO, assign your PHLO to a Plivo number.- On the Numbers page of the console, under Your Numbers, click the phone number you want to use for the PHLO.
- In the Number Configuration box, select PHLO from the Application Type drop-down.
- From the PHLO Name drop-down, select the PHLO you want to use with the phone number, then click Update Number.
Test
You can now call your Plivo phone number and see how the inbound call is forwarded.For more information about creating a PHLO application, see the PHLO Getting Started guide. For information on components and their variables, see the PHLO Components Library.More use cases
We illustrate more than 20 use cases with code for both PHLO and API/XML on our documentation pages.Install Python, FastAPI, and the Plivo Python SDK
You must set up and install Python, FastAPI, and Plivo’s Python SDK before you make your first call.Install Python
Download and install Python from its official site.Install FastAPI and the Plivo Python SDK
Create a projects directory and change into it.Copy
Ask AI
$ mkdir mypythonapp
$ cd mypythonapp
Copy
Ask AI
$ pip install fastapi
Copy
Ask AI
$ pip install uvicorn
Copy
Ask AI
$ pip install plivo
Make your first outbound call
Copy
Ask AI
<Response>
<Speak>Congratulations! You've made your first outbound call!</Speak>
</Response>
Set up a FastAPI server to handle outbound calls
Create a file calledmain.py and paste into it this code.Copy
Ask AI
import plivo
from typing import Optional
from fastapi import FastAPI, Response
from plivo import plivoxml

app = FastAPI()

@app.get("/outbound/")
def make_call():
    client = plivo.RestClient('<auth_id>','<auth_token>')
    response = client.calls.create(
        from_='<caller_id>',
        to_='<destination_number>',
        answer_url='https://s3.amazonaws.com/static.plivo.com/answer.xml',
        answer_method='GET', )
    return response
Note:
We recommend that you store your credentials in the
auth_id and auth_token environment variables to avoid the possibility of accidentally committing them to source control. If you do this, you can initialize the client with no arguments and Plivo will automatically fetch the values from the environment variables. You can use os.environ to store environment variables and retrieve them when initializing the client.Test
Save the file and run your code.Copy
Ask AI
$ uvicorn main:app --reload
Receive your first inbound call
Set up a FastAPI server to handle incoming calls
Editmain.py and paste this code into it after the make_call function block.Copy
Ask AI
import plivo
from typing import Optional
from fastapi import FastAPI, Response
from plivo import plivoxml

app = FastAPI()

@app.get("/outbound/")
def make_call():
    ......
    ......

@app.get("/inbound/")
def receive_call():
    # Generate a Speak XML document with the details of the text to play on the call
    response = (plivoxml.ResponseElement()
                .add(plivoxml.SpeakElement('Hello, you just received your first call')))
    return Response(response.to_string(), media_type="application/xml")
Copy
Ask AI
$ uvicorn main:app --reload
Expose your local server to the internet
To receive incoming calls, your local server must connect with Plivo API services. For that, we recommend using ngrok, which exposes local servers running behind NATs and firewalls to the public internet over secure tunnels. Using ngrok, you can set webhooks that can talk to the Plivo server.Copy
Ask AI
./ngrok http 8000


Create a Plivo application to receive calls
Associate the FastAPI application you created with Plivo by creating a Plivo application. Visit Voice > Applications and click Add New Application. You can also use Plivo’s Application API.Give your application a name — we called oursReceive_call. Enter the server URL you want to use (for example https://<yourdomain>.com/receive_call.php/) in the Primary Answer URL field and set the method to POST. Click Create Application to save your application.Assign a Plivo number to your application
Navigate to the Numbers page and select the phone number you want to use for this application.From the Application Type drop-down, selectXML Application.From the Plivo Application drop-down, select Receive_call (the name we gave the application).Click Update Number to save.Test
Make a call to your Plivo number using any phone.Forward an incoming call
Set up a FastAPI server to forward calls
Editmain.py and paste this code into it after the receive_call function block.Copy
Ask AI
import plivo
from typing import Optional
from fastapi import FastAPI, Response
from plivo import plivoxml
app = FastAPI()
@app.get("/outbound/")
def make_call():
.......
.......
@app.get("/inbound/")
def receive_call():
.......
.......
@app.get("/forward/")
def forward_call():
response = (plivoxml.ResponseElement()
# Generate a Dial XML document to forward the incoming call
response = plivoxml.ResponseElement()
response.add(
plivoxml.DialElement().add(
plivoxml.NumberElement('<destination_number>')))
return Response(response.to_string(), media_type="application/xml")
Create a Plivo application to forward calls
Associate the Django app you created with Plivo by creating a Plivo application. Visit Voice > Applications in the Plivo console and click on Add New Application, or use Plivo’s Application API.Give your application a name — we called oursForward Call. Enter the server URL you want to use (for example https://<yourdomain>.com/forward_call/) in the Answer URL field and set the method to POST. Click Create Application to save your application.Assign a Plivo number to your application
Navigate to the Numbers page and select the phone number you want to use for this application.From the Application Type drop-down, selectXML Application.From the Plivo Application drop-down, select Forward Call (the name we gave the application).Click Update Number to save.Test
Make a call to your Plivo number using any phone. Plivo will send a request to the answer URL you provided requesting an XML response and then forward the call according to the instructions in the XML document the server provides.More use cases
We illustrate more than 20 use cases with code for both API/XML and PHLO on our documentation pages.Get Started with Python Using Sanic Framework
Start by signing up for a free trial account that you can use to experiment with and learn about our services. The free trial account comes with free credits, and you can add more as you go along. You can also add a phone number to your account to start testing the full range of our voice and SMS features. A page in our support portal walks you through the signup process.You can start making and receiving calls either by using our PHLO visual workflow builder or our APIs and XML documents. Follow the instructions in one of the tabs below.- Using PHLO
- Using XML
Set up your Python Sanic dev environment
You must set up and install Python, Sanic, and Plivo’s Python SDK before you make your first call.Install Python
Download and install Python from its official site.Install Sanic and the Plivo Python SDK
Create a projects directory and change into it.Copy
Ask AI
$ mkdir mypythonapp
$ cd mypythonapp
Copy
Ask AI
$ pip3 install sanic
$ pip3 install plivo
sudo with your commands and overwriting dependencies.Make your first outbound call
You can create and deploy a PHLO to make an outbound call with a few clicks on the PHLO canvas, and trigger it with some simple code.Create the PHLO
To create a PHLO, visit the PHLO page of the Plivo console. If this is your first PHLO, the PHLO page will be empty.- Click Create New PHLO.
-
In the Choose your use case pop-up, click Build my own. The PHLO canvas will appear with the Start node.
Note: The Start node is the starting point of any PHLO. It lets you trigger a PHLO to start upon one of three actions: incoming SMS message, incoming call, or API request.
- From the list of components on the left side, drag and drop the Initiate Call component onto the canvas. When a component is placed on the canvas it becomes a node.
- Draw a line to connect the Start node’s API Request trigger state to the Initiate Call node.
-
In the Configuration pane at the right of the canvas, configure the Initiate Call node with a caller ID in the From field. Enter the destination number you wish to call in the To field.
Note: You can define a static payload by specifying values when you create the PHLO, or define a dynamic payload by passing values through Liquidtemplating parameters when you trigger the PHLO from your application.
- Once you’ve configured the node, click Validate to save the configuration.
- Similarly, create a node from the Play Audio component. Connect the Initiate Call node to the Play Audio node using the Answered trigger state.
- Configure the Play Audio node to play a message to the user by entering text in the Speak Text box in the Prompt section of the Configuration pane — for example, “Hello, you just received your first call.”
- Connect the Initiate Call node’s Answered trigger state to the Play Audio node.
- After you complete the configuration, give the PHLO a name by clicking in the upper left, then click Save.
Trigger the PHLO
You integrate a PHLO into your application workflow by making an API request to trigger the PHLO with the required payload — the set of parameters you pass to the PHLO. You can define a static payload by specifying values when you create the PHLO, or define a dynamic payload by passing values through parameters when you trigger the PHLO from your application.In either case, you need your Auth ID and Auth Token, which you can get from the overview page of the Plivo console.With a static payload
When you configure values when creating the PHLO, they act as a static payload.Code
Create a file calledtrigger_phlo.py and paste into it this code.Copy
Ask AI
import plivo
from sanic import Sanic
from sanic.response import text

app = Sanic('Plivo Voice App')

@app.route('/outbound', methods=['POST', 'GET'])
async def make_call(request):
  auth_id = '<auth_id>'
  auth_token = '<auth_token>'
  phlo_id = '<phlo_id>'
  phlo_client = plivo.phlo.RestClient(auth_id=auth_id, auth_token=auth_token)
  phlo = phlo_client.phlo.get(phlo_id)
  response = phlo.run()
  return text(response, content_type="text/json")

if __name__ == "__main__":
  app.run(host="0.0.0.0", port=8000)
With a dynamic payload
To use dynamic values for the parameters, use Liquid templating parameters when you create the PHLO and pass the values from your code when you trigger it.Code
Create a file calledtrigger_phlo.py and paste into it this code.Copy
Ask AI
import plivo
from sanic import Sanic
from sanic.response import text

app = Sanic('Plivo Voice App')

@app.route('/outbound', methods=['POST', 'GET'])
async def make_call(request):
    auth_id = '<auth_id>'
    auth_token = '<auth_token>'
    phlo_id = '<phlo_id>'
    payload = {"from" : "<caller_id>","to" : "<destination_number>"}
    phlo_client = plivo.phlo.RestClient(auth_id=auth_id, auth_token=auth_token)
    phlo = phlo_client.phlo.get(phlo_id)
    response = phlo.run(**payload)
    return text(response, content_type="text/json")

if __name__ == "__main__":
  app.run(host="0.0.0.0", port=8000)
Test
Save the file and run it.Copy
Ask AI
$ python trigger_phlo.py
Receive your first inbound call
You can create and deploy a PHLO to receive an inbound call with a few clicks on the PHLO canvas, without writing a single line of code.Prerequisite
To receive incoming calls, you must have a voice-enabled Plivo phone number. You can rent numbers from the Numbers page of the Plivo console, or by using the Numbers API.Create the PHLO
To create a PHLO, visit the PHLO page of the Plivo console. If this is your first PHLO, the PHLO page will be empty.- Click Create New PHLO.
-
In the Choose your use case pop-up, click Build my own. The PHLO canvas will appear with the Start node.
Note: The Start node is the starting point of any PHLO. It lets you trigger a PHLO to start upon one of three actions: incoming SMS message, incoming call, or API request.
- From the list of components on the left side, drag and drop the Play Audio component onto the canvas. When a component is placed on the canvas it becomes a node.
- Draw a line to connect the Start node’s Incoming Call trigger state to the Play Audio node.
- In the Configuration pane at the right of the canvas, configure the Play Audio node to play a message to the caller.
- Once you’ve configured the node, click Validate to save the configuration.
- Give the PHLO a name by clicking in the upper left, then click Save.
Assign the PHLO to a Plivo number
Once you’ve created and configured your PHLO, assign it to a Plivo number.- On the Numbers page of the console, under Your Numbers, click the phone number you want to use for the PHLO.
- In the Number Configuration box, select PHLO from the Application Type drop-down.
- From the PHLO Name drop-down, select the PHLO you want to use with the number, then click Update Number.
Test
You can now make a call to your Plivo phone number and see how the inbound call is handled.For more information about creating a PHLO application, see the PHLO Getting Started guide. For information on components and their variables, see the PHLO Components Library.Forward an inbound call
You can create and deploy a workflow to implement call forwarding with a few clicks on the PHLO canvas.Prerequisite
To receive incoming calls, you must have a voice-enabled Plivo phone number. You can rent numbers from the Numbers page of the Plivo console, or by using the Numbers API.Create the PHLO
To create a PHLO, visit the PHLO page of the Plivo console. If this is your first PHLO, the PHLO page will be empty.- Click Create New PHLO.
-
In the Choose your use case pop-up, click Build my own. The PHLO canvas will appear with the Start node.
Note: The Start node is the starting point of any PHLO. It lets you trigger a PHLO to start upon one of three actions: incoming SMS message, incoming call, or API request.
- From the list of components on the left side, drag and drop the Call Forward component onto the canvas. When a component is placed on the canvas it becomes a node.
-
Draw a line to connect the Start node‘s Incoming Call trigger state to the Call Forward node.
-
In the Configuration tab at the right of the canvas, configure the Call Forward node to select the From number using a variable. Enter two curly brackets to view all available variables, and choose the appropriate one. Enter all the numbers you want to call in the To field, separated with commas.
- Once you’ve configured the node, click Validate to save the configuration.
- Give the PHLO a name by clicking in the upper left, then click Save.
Assign the PHLO to a Plivo number
Once you’ve created and configured your PHLO, assign your PHLO to a Plivo number.- On the Numbers page of the console, under Your Numbers, click the phone number you want to use for the PHLO.
- In the Number Configuration box, select PHLO from the Application Type drop-down.
- From the PHLO Name drop-down, select the PHLO you want to use with the phone number, then click Update Number.
Test
You can now call your Plivo phone number and see how the inbound call is forwarded.For more information about creating a PHLO application, see the PHLO Getting Started guide. For information on components and their variables, see the PHLO Components Library.More use cases
We illustrate more than 20 use cases with code for both PHLO and API/XML on our documentation pages.Install Python, Sanic, and the Plivo Python SDK
You must set up and install Python, Sanic, and Plivo’s Python SDK before you make your first call.Install Python
Download and install Python from its official site.Install Sanic and the Plivo Python SDK
Create a projects directory and change into it.Copy
Ask AI
$ mkdir mypythonapp
$ cd mypythonapp
Copy
Ask AI
$ pip install sanic plivo
Make your first outbound call
Copy
Ask AI
<Response>
<Speak>Congratulations! You've made your first outbound call!</Speak>
</Response>
Set up a Sanic server to handle outbound calls
Create a file calledmain.py and paste into it this code.Copy
Ask AI
import plivo
from plivo import plivoxml
from sanic import Sanic
from sanic.response import text

app = Sanic('Plivo Voice App')

@app.route('/outbound', methods=['POST', 'GET'])
async def make_call(request):
  client = plivo.RestClient('<auth_id>','<auth_token>')
  response = client.calls.create(
      from_='<caller_id>',
      to_='<destination_number>',
      answer_url='https://s3.amazonaws.com/static.plivo.com/answer.xml',
      answer_method='GET', )
  print(response)
  return text(response, content_type="text/json")

if __name__ == "__main__":
  app.run(host="0.0.0.0", port=8000)
Note:
We recommend that you store your credentials in the
auth_id and auth_token environment variables to avoid the possibility of accidentally committing them to source control. If you do this, you can initialize the client with no arguments and Plivo will automatically fetch the values from the environment variables. You can use os.environ to store environment variables and retrieve them when initializing the client.Test
Save the file and run your code.Copy
Ask AI
$ python main.py
Receive your first inbound call
Set up a Sanic server to handle incoming calls
Editmain.py and paste this code into it after the make_call function block.Copy
Ask AI
import plivo
from plivo import plivoxml
from sanic import Sanic
from sanic.response import text

app = Sanic('Plivo Voice App')

@app.route('/outbound', methods=['POST', 'GET'])
async def make_call(request):
  .......
  .......


@app.route('/inbound', methods=['POST', 'GET'])
async def receive_call(request):
    # Generate a Speak XML document with the details of the text to play on the call
    response = (plivoxml.ResponseElement()
                .add(plivoxml.SpeakElement('Hello, you just received your first call')))
    return text(response.to_string(), content_type="text/xml")

if __name__ == "__main__":
  app.run(host="0.0.0.0", port=8000)
Copy
Ask AI
$ python main.py
Expose your local server to the internet
To receive incoming calls, your local server must connect with Plivo API services. For that, we recommend using ngrok, which exposes local servers running behind NATs and firewalls to the public internet over secure tunnels. Using ngrok, you can set webhooks that can talk to the Plivo server.Copy
Ask AI
./ngrok http 8000
Create a Plivo application to receive calls
Associate the Sanic application you created with Plivo by creating a Plivo application. Visit Voice > Applications and click Add New Application. You can also use Plivo’s Application API.Give your application a name — we called oursReceive_call. Enter the server URL you want to use (for example https://<yourdomain>.com/receive_call.php/) in the Primary Answer URL field and set the method to POST. Click Create Application to save your application.Assign a Plivo number to your application
Navigate to the Numbers page and select the phone number you want to use for this application.From the Application Type drop-down, selectXML Application.From the Plivo Application drop-down, select Receive_call (the name we gave the application).Click Update Number to save.Test
Make a call to your Plivo number using any phone.Forward an incoming call
Set up a Sanic server to forward calls
Editmain.py and paste this code into it after the receive_call function block.Copy
Ask AI
import plivo
from plivo import plivoxml
from sanic import Sanic
from sanic.response import text

app = Sanic('Plivo Voice App')

@app.route('/outbound', methods=['POST', 'GET'])
async def make_call(request):
  .......
  .......


@app.route('/inbound', methods=['POST', 'GET'])
async def receive_call(request):
  .......
  .......


@app.route('/forward', methods=['POST', 'GET'])
async def forward_call(request):
    response = plivoxml.ResponseElement()
    response.add(
        plivoxml.DialElement().add(
            plivoxml.NumberElement('<destination_number>')))
    return text(response.to_string(), content_type="text/xml")

if __name__ == "__main__":
  app.run(host="0.0.0.0", port=8000)
Create a Plivo application to forward calls
Associate the Django app you created with Plivo by creating a Plivo application. Visit Voice > Applications in the Plivo console and click on Add New Application, or use Plivo’s Application API.Give your application a name — we called oursForward Call. Enter the server URL you want to use (for example https://<yourdomain>.com/forward_call/) in the Answer URL field and set the method to POST. Click Create Application to save your application.Assign a Plivo number to your application
Navigate to the Numbers page and select the phone number you want to use for this application.From the Application Type drop-down, selectXML Application.From the Plivo Application drop-down, select Forward Call (the name we gave the application).Click Update Number to save.